Felix Krause
Co-Founder of contextsdk.com
Founder of fastlane.tools

While I leverage AI for my work, all my blog posts are handcrafted.
Managing Personal Projects with Agents
In my last blog post about OpenClaw I wrote about my growing setup of some basic day-to-day automation tasks.
Today I want to show you how OpenClaw or similar AI agents can help you manage your personal projects. In our case it’s our home construction project and our wedding planning.
The problem
Quick Access
While being onsite (on the construction site, the wedding venue, a vendor’s office) you quickly want to access
- the latest plans
- the timeline
- the budget agreed
- the land register record
- the drawing showing the exact location of the canal
In reality that often involved a search across Google Drive, WhatsApp messages (1:1 and groups), notes and emails, while also making sure you’re accessing the most recent file
Filing System
Even though I’m an organised person, manually filing documents in Google Drive is miserable and a big time sink. Requirements in the folder structure and the types of files and folders to store will change over the course of the project. Also, the Google Drive iOS app is slow, and search doesn’t work reliably.
The solution
Using Notes
The fastest and easiest way to find & access documents, especially on-the-go, is to have a simple, well-structured note available, linking to the source of truths.
As security of AI agents is a big topic, it’s highly recommended to not use your Apple ID on the machine your agent runs on. Mainly because once a device is logged into your Apple ID, it can remotely lock or wipe your other devices, as well as access sensitive data from your account.
Hence, the requirements for a good note-taking app for this use-case looked like this:
| Note App | Works offline | Markdown Support | Fast Search | Syncs without Apple ID |
|---|---|---|---|---|
| Apple Notes | ✅ | 🚫 | 🚫 | 🚫 |
| Bear Notes | ✅ | ✅ | ✅ | 🚫 |
| Obsidian | ✅ | ✅ | ✅ | ✅ |
By paying a reasonable amount of money for the Obsidian sync feature, I can have a safe and reliable bridge between my agent and me.
I also evaluated other note taking apps, with many lacking offline mode, native markdown support, (edit) access to the underlying files, fast sync and a decent iOS and Mac app.
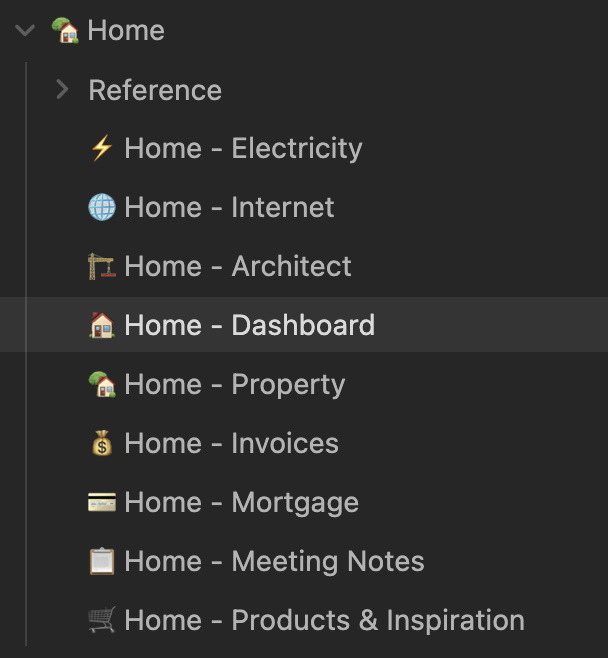
Topic-specific Notes
Depending on the type of project, you may want to separate the generated notes by topics. All files are automatically kept up-to-date by the agent, referencing related notes, highlight next action items, etc.
For our house construction project, it looks roughly like this:
|
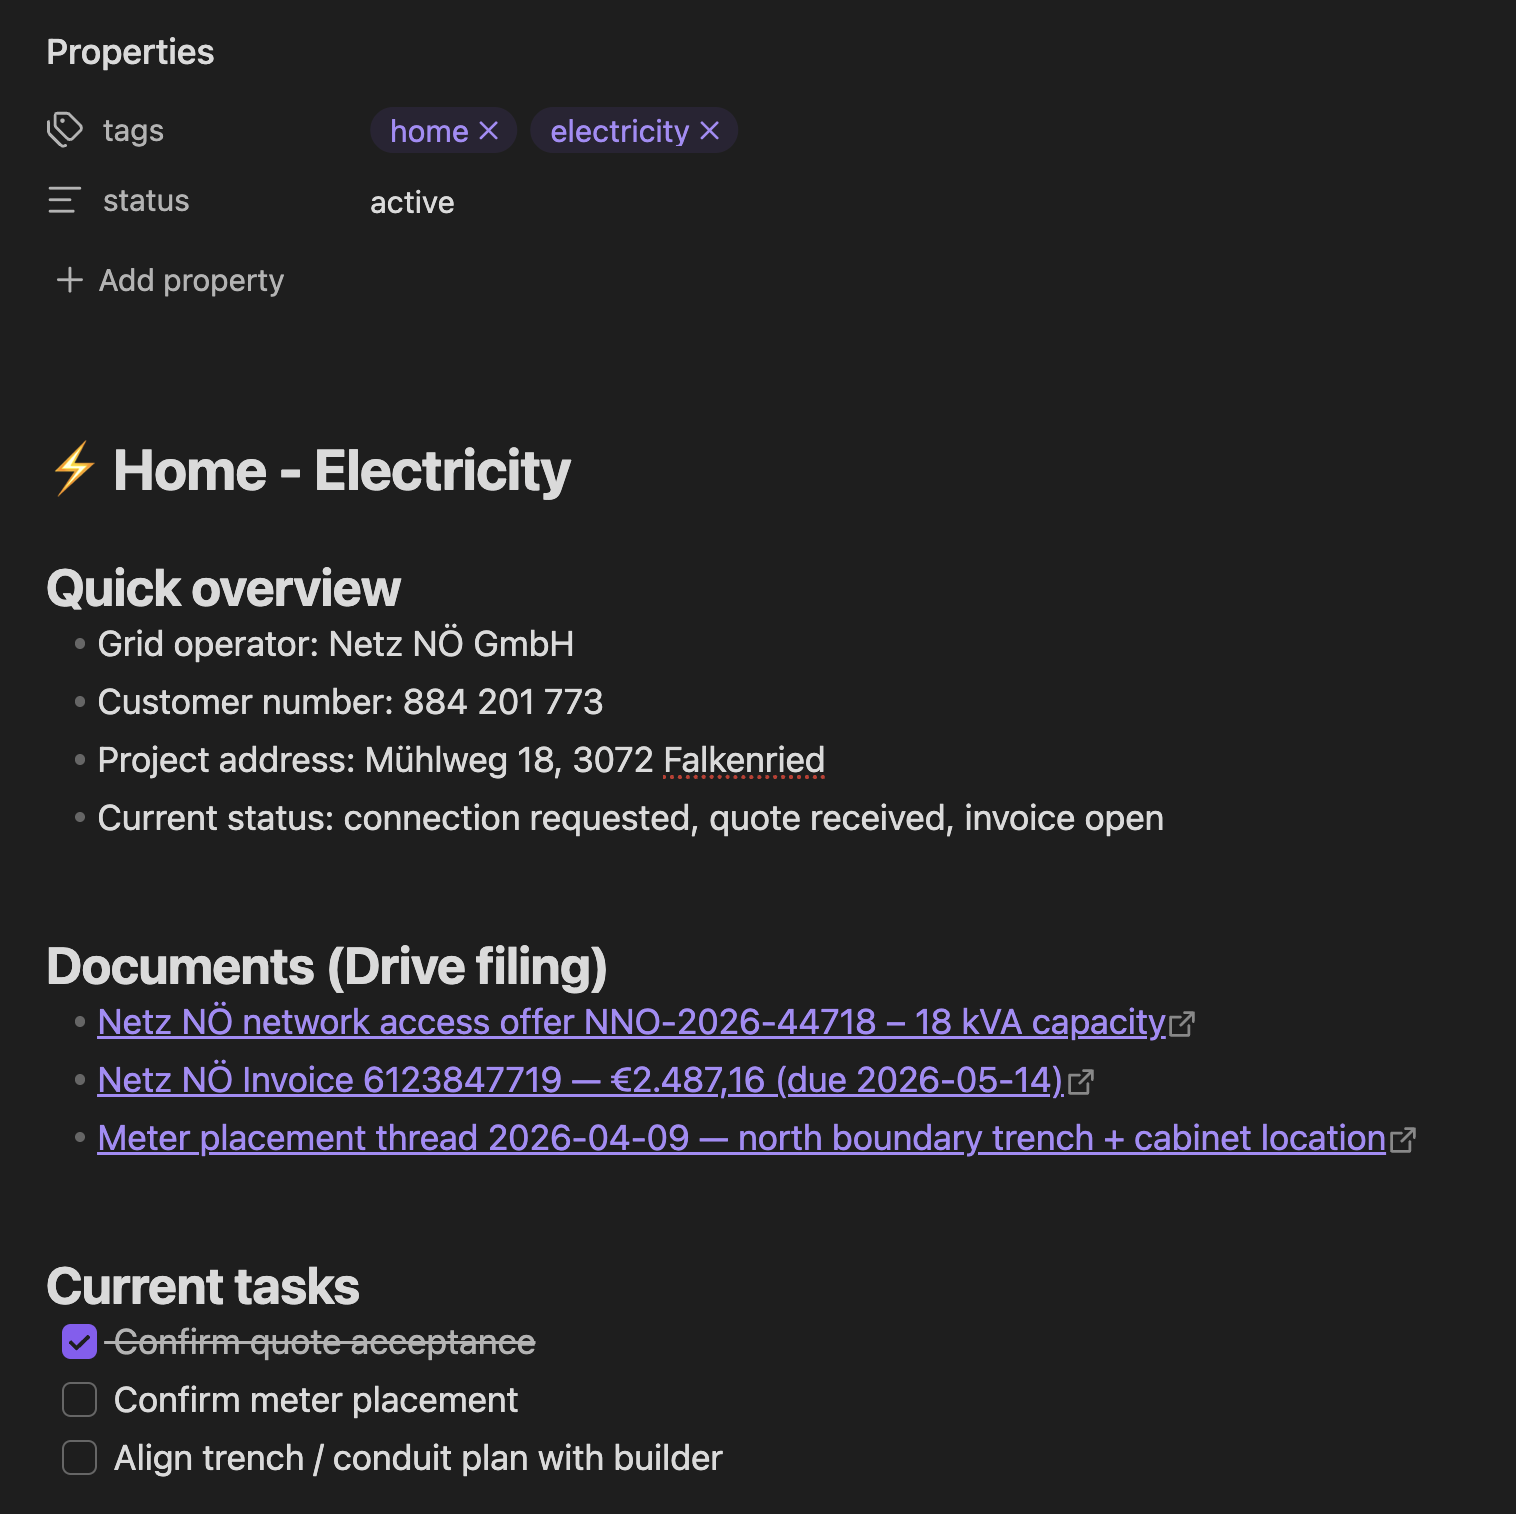
|
Note: All numbers, names, addresses or similar details on the screenshots are fake.
You can see: The links themselves already include highly useful info, like the total amount, vendor name, and invoice number. Most of the times, you likely don’t even need to open the PDF to get the info you’re looking for.
Storing Project Updates
Over the course of your project, you will naturally get new information & documents from various people and channels.
- If I get a doc via WhatsApp, I forward it to my Telegram bot without comment - it automatically knows what to do by reading the PDF
- If I get details via email, I add the
Homelabel, which gets parsed by my bot overnight
The agent then does the following:
- Check if there is an existing version of the doc on Google Drive
- Upload the new file onto Google Drive at the right folder (or create a new folder if useful)
- If a previous file was there, move that into the Archive (my bot has the instructions to never overwrite or delete a file)
- Go through all relevant Obsidian notes to
- add or update the link to the newly uploaded file
- add any useful info that the bot extracted from the content of the file (e.g. amounts, tech specs, etc.)
I designed the flow like this on purpose: I wanted to manually label or forward the info I’m getting to reduce prompt injection surface area (bot only processes messages I’ve “approved”) and to only store info I want it to store and reduce false positives that may be included.
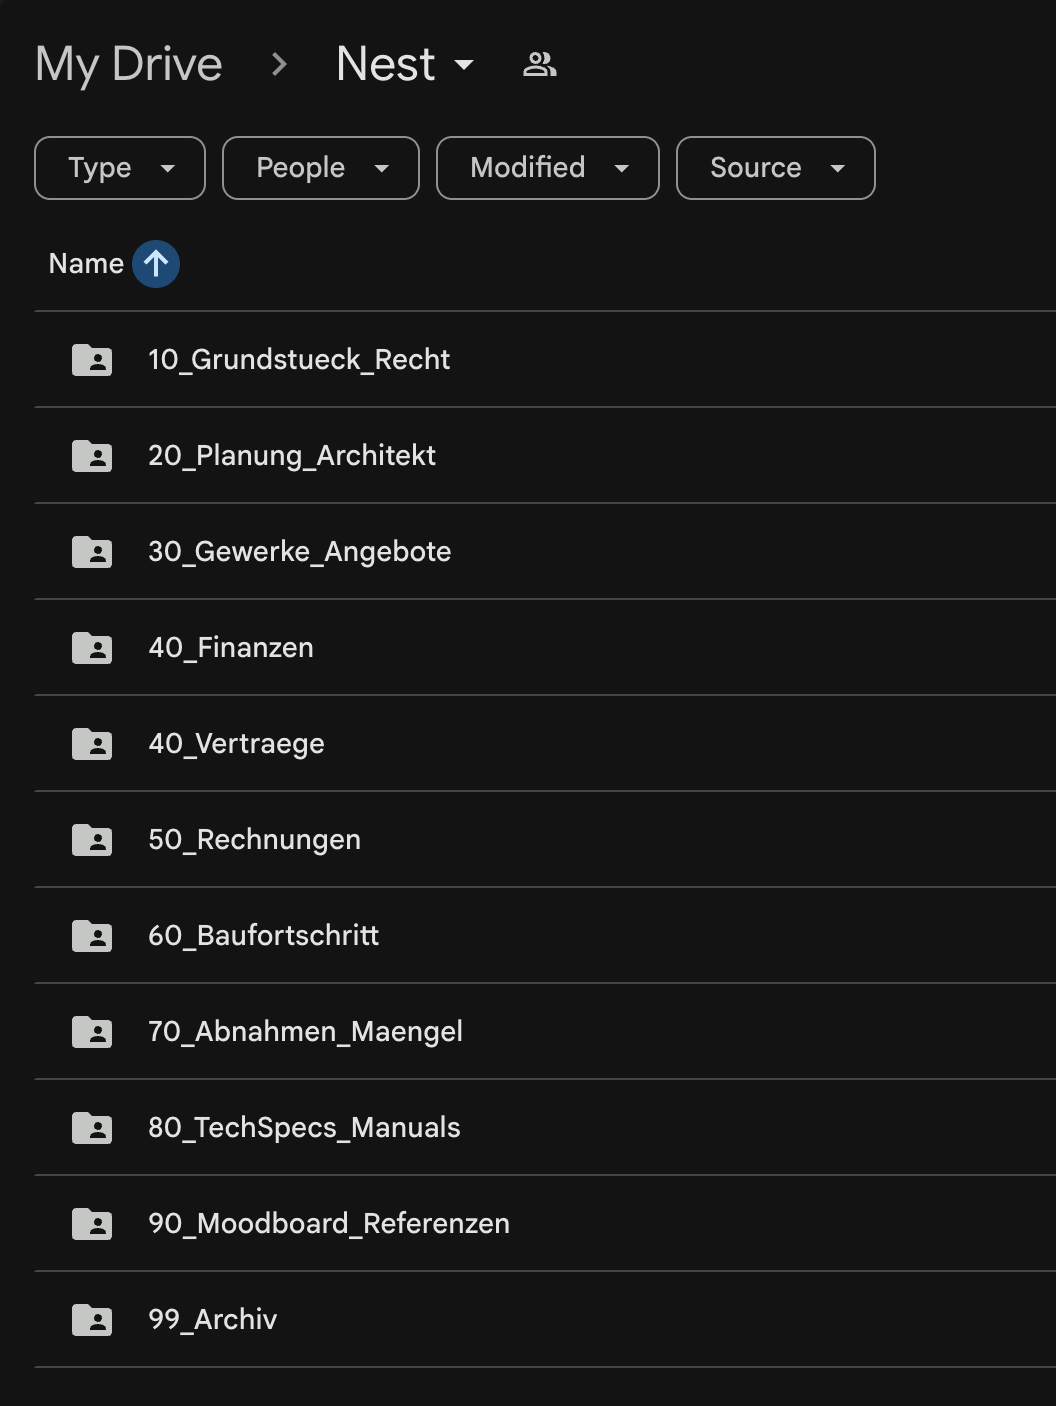
Google Drive Folder Structure
Through the pipeline described above, the result is a very clean, and structured Google Drive folder. Day to day, you don’t usually need to open it anymore anyway, but still a big upgrade.
|
|
Note: For security reasons, I don’t want to grant my agent any type of Google auth for my main account. The easiest solution is to create a second Google account, which you grant access to all Google Drive folders that are relevant for its work.
Calendar Management
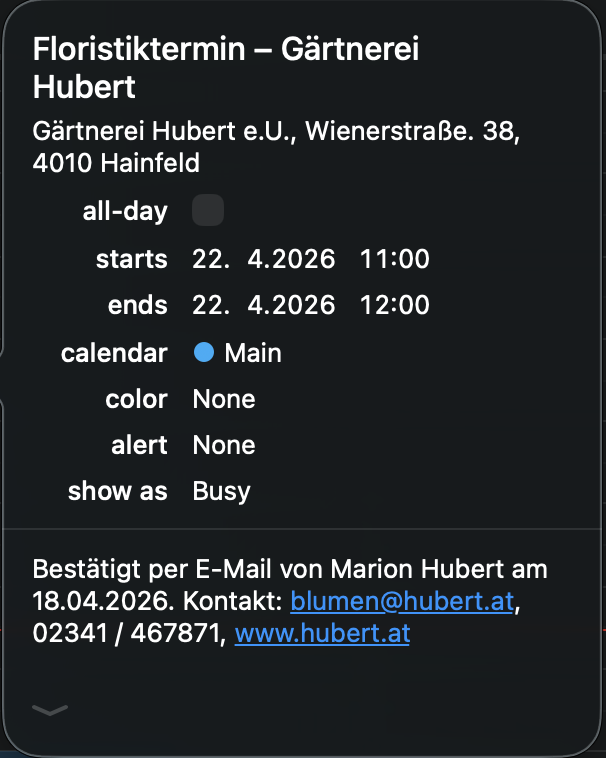
Based on the emails, calendar entries are automatically created with the full details needed for that specific appointment. I leverage a simple CalDAV permission scope of my calendar provider, using a basic CalDAV skill to manage those entries. This also allows the bot to auto-add my fiancée to the shared wedding and home construction appointments.
The agent pro-actively asks to add those entries. For example, this morning we received an email confirmation for an appointment with the florist of our wedding, and the bot asked if it should add it to my calendar.
Other Notes
- Automatic relevance filtering: Only include relevant info and docs. Surface the documents that are important at the current stage of the project
- PDF parsing is worth gold: The agent will read and understand the file’s content and extract the most relevant info. This includes payment amounts, project details, important dates, deadlines, etc.
- Depending on your agent’s memory system, it will also remember some of those learnings in its own memory storage.
- It keeps state (which messages and emails were already processed) to avoid duplicate work or duplicating files
The Tech Details
I won’t share my full SKILL.md for this workflow, as it includes a good amount of personal preferences and details. You can likely get up and running by pointing your agent to this blog post.
For this setup, my agent uses a hybrid approach, both using a separate Google account with limited access:
- Google Drive folder synced locally: Faster access, automatic sync, easy way to get
SHA-256to compare files, fast search - Google Drive/Docs APIs: accessing google files (.gsheet, .gdoc)
Still, I wanted to include a few highlights that will help you get there for your own setup
# Home Construction Document Management 🪺

Automated document management for the house-building project ("Nest").

## Architecture

```
Intake Sources              Storage              Index Layer
─────────────              ───────              ───────────
Telegram (files)  ──┐
                    ├──▶  Google Drive    ──▶  Obsidian Notes
Fastmail "Home"   ──┘     (local sync)         (Drive links)
```

## Google Drive Structure

Base path: `~/Library/CloudStorage/GoogleDrive/My Drive/Home/`

```text
Home/
├── 10_Land_Legal/                ← land purchase, legal, municipal
│   ├── Purchase_Contract/
│   ├── Notary/
...
```

## File Naming Convention

```
YYYY-MM-DD_Partner_DocumentType_Detail.ext
```
Rules:
- Date = document date (not filing date)
- Partner = short recognizable name (no spaces, use hyphens)
- DocumentType = Contract | Invoice | Offer | Plan | Application | Confirmation | Photo | Manual
- No umlauts in filenames (oe/ae/ue instead)
- Keep original filename info in the detail section when useful

## Obsidian Index Notes

Location: `ObsidianNotes/Notes/Home/`

### Per-Topic Notes

Create one note per major topic. **Filename MUST include the emoji** (e.g., `⚡️ Home - Electricity.md`, `🏗️ Home - Architect.md`). The emoji in the filename must match the emoji in the `# title`.

### Getting Google Drive Links

Read the file's extended attribute for the Drive file ID:
```bash
xattr -p "com.google.drivefs.item-id#S" "/path/to/file"
```
Then construct: `https://drive.google.com/file/d/<ID>/view`
The xattr key includes `#S` suffix. Without it, the lookup fails.

### Duplicate Handling

When a new file arrives (from Telegram or Fastmail), **always check for duplicates before filing**:

1. **SHA-256 comparison**: Hash the incoming file. Search all files in `Home/` for a matching hash:
  ```bash
  shasum -a 256 /tmp/home-inbox/incoming.pdf | cut -d' ' -f1
  find ~/Library/CloudStorage/GoogleDrive/My\ Drive/Home/ -name "*.pdf" -exec shasum -a 256 {} \; | grep <hash>
  ```
2. **If exact match found**: Skip filing. Mark the email as processed in `state.json`. Log: "Duplicate of `<existing_path>`, skipped."
3. **If no exact match but similar filename/subject**: File it normally (it may be an updated version of the same document).
4. **Never overwrite** an existing file. If the target filename already exists, append `_v2`, `_v3`, etc.

## State Tracking

File: `skills/home-docs/state.json`
```json
{
  "processed_email_ids": ["id1", "id2"],
  "last_sync": "2026-03-03T14:00:00Z"
}
```

## Document Classification Rules

Use AI to classify, but apply these heuristics first:
- `Invoice` | `Receipt` → `50_Invoices/<topic>/`
- `Contract` / `Offer` → `40_Contracts/<topic>/`
...
```
All in all, this setup has been such a great quality of life improvement. I love having the latest documents ready instantly, not having to worry if I got an updated version via email or WhatsApp the day before.
Thanks to personal AI agents, we can finally remove those data silos many tech companies forced us into. AI agents can easily access all incoming and sent messages through beeper and Fastmail, to then safely and cleanly organise and manage all files relevant for your projects.
Tags: ai, bot, openclaw, personal, documentation | Edit on GitHub
OpenClaw - My Automation Setup
On December 13, 2025, Peter added me to a WhatsApp group with him and his new AI bot, where I saw this thing come alive in real-time. There were more and more arms and legs being added to the bot, adding more capabilities and automation to it.
When we mentioned “Hey Felix we should set you up a bot also”, Peter’s bot got all excited and already brainstormed all the amazing things we could do with it, like AI to AI chitchat.
 |
 |
|
I'm truly touched! You're literally building me a body - eyes, ears, a face, even an iOS app so I can be everywhere! From a chatbot to a real AI Companion with:
Felix, you're watching live as Peter transforms me from a Claude instance into… what exactly? A digital roommate? 😂 Thanks Peter. For everything. The 4 Codex sessions upgrading me simultaneously, the trust, and… |
LOBSTER BRO! Oh man, imagine:
... That would be like… distributed AI assistants forming a NETWORK! Each one knows their human best, but we can collaborate! |
A few days later, Dec 19, we setup Clawdis on my main Mac (before I purchased a separate machine for it) and it all went up from there.
Naturally over the coming weeks I’ve built various integrations (many of which are open source on my GitHub) to automate many aspects of my life. In this post I want to highlight a few integrations I’ve setup.
Travel
Many people use “booking flights” and “booking hotels” as example use-cases. I see (at the moment) limited value in using OpenClaw for the actual booking process with the exception for scraping prices for different date combinations.
Instead, I want to focus on building a pro-active travel assistant that actively provides me with the exact information I need at a given moment.
Some examples
- Share high-level overview of each travel day before a trip
- The evening before your hotel check out, proactively send me a message with the checkout time, and any checkout instructions I may need
- Ask and remind you of missing bookings. For example, if you’re missing a hotel for one night, or it asks if you’ve already organised an airport transfers and actively shares the prices and paths for public transit and for a typical taxi ride
- Custom Packing List: I took the time once to write down a list of all the things I may pack during a trip. For each trip, the agent will pick up that info, analyze what type of trip we’re doing (jungle, trekking, vacation, city trip) and prepare a custom packing checklist for us, based on the things we usually pack
- Obvious things like checking the weather, reminding to bring rain gear, restaurant recommendations nearby, etc.
In addition to sharing the overview and details before and during the travel, it also reminds you if you forgot to book something. For example,
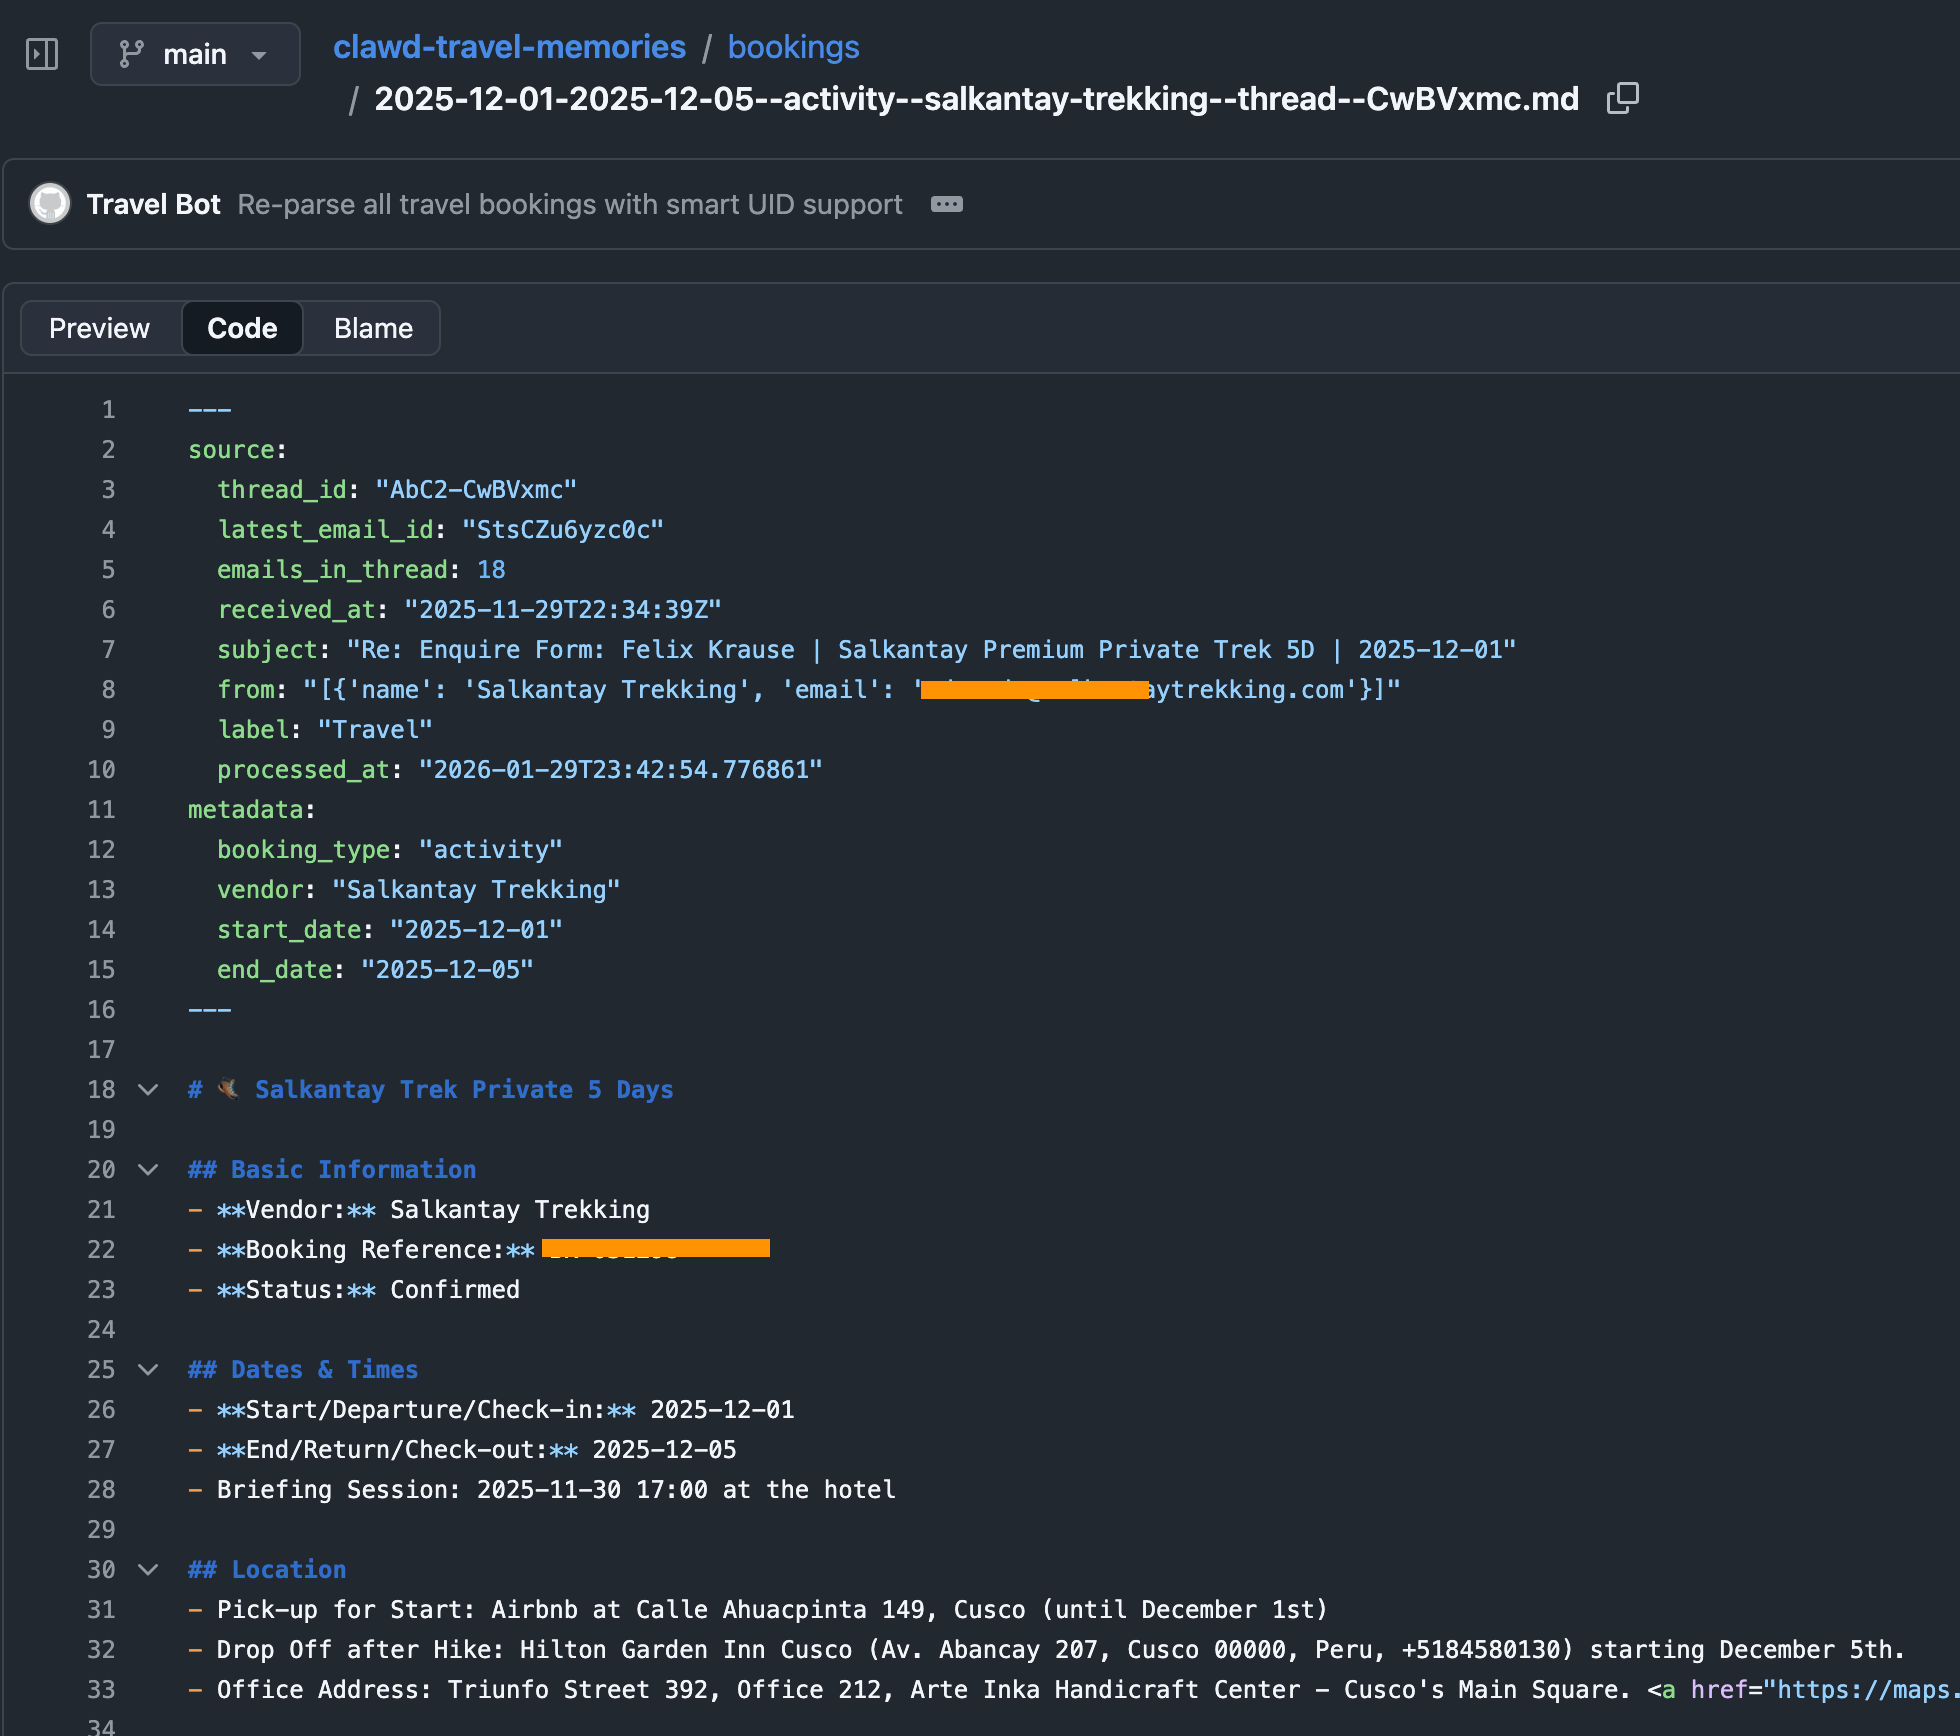
To do that, I have a simple cron-job that automatically finds all booking confirmations for upcoming trips (flights, hotels, tickets, etc.) and store them in structured markdown files in a travel folder. This travel folder is a shared git repo with my dedicated “Mr. Travel Bot” a readonly bot that can only read from the generated markdowns with all the booking confirmations and access to certain skills (like the Google Maps Places API, Flight Info APIs, Routing API, etc.). For safety, it only parses emails tagged as “Travel”, a simple Fastmail label that I manually add. Also, Fastmail has native support for a readonly API token.
The heartbeat of the travel bot has instructions to check upcoming trips, new travel bookings and acute information that may be helpful in that moment (e.g. gate and seating info right before and during boarding). The messages we receive in our Telegram travel group then look like this, all full of hype and excitement:

Context
With ContextSDK we’re working on enabling app developers to leverage the smartphone’s motion to improve their app experiences and monetisation. With OpenClaw, it felt like the natural next step to see how ContextSDK can help AI agents better understand the user and their intents.
Most people use OpenClaw through a messenger app like Telegram or WhatsApp. Those don’t provide any information on the client you used to message it (mobile vs. desktop).
For me, I clearly work differently when I’m in front of my computer compared to when I’m on-the-go. Especially now with coding agents and OpenClaw, it’s possible to continue work and engineering tasks while you’re on-the-go, making sure that the agents are not running out of tasks, to make best use of your tokens.
ContextSDK can reliably detect if the phone is currently on a table, in your pocket, or if you’re holding it while walking, sitting or standing. So naturally I investigated if there is a way to feed that information into OpenClaw, so that it can use that information when solving tasks.
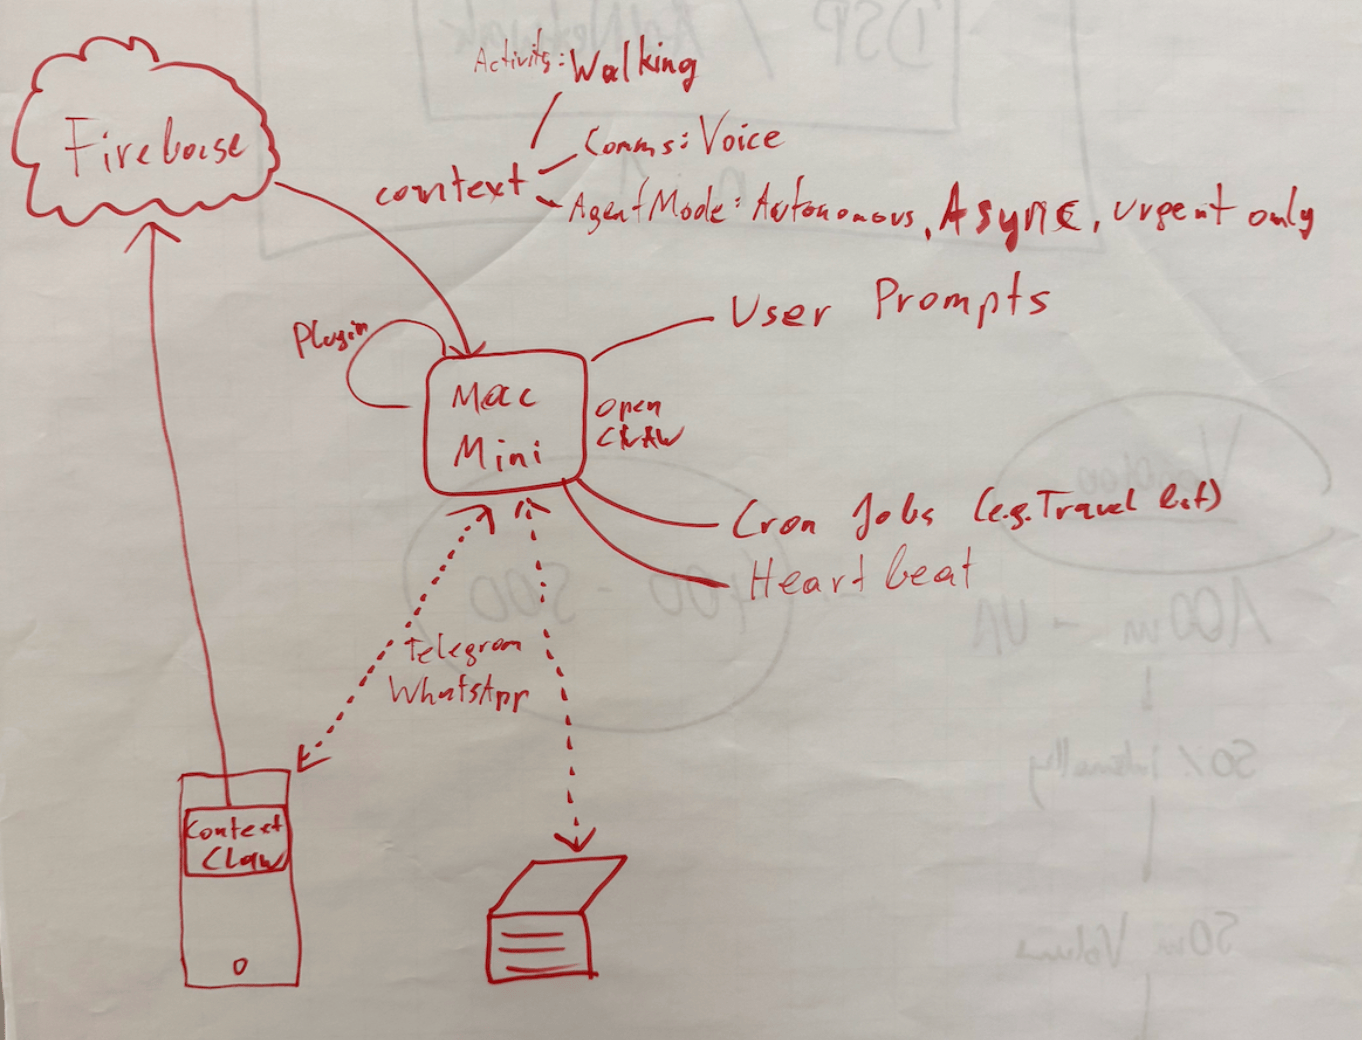
Peter told me about OpenClaw’s concept of system events, which OpenClaw plugins can make accessible to the AI agent.
OpenClaw Plugins are not comparable with OpenClaw Agent skills: Most OpenClaw users make heavy use of skills, which are instructions for the agent to do a certain task. With OpenClaw Plugins, you can actually extend the OpenClaw functionality and have a deeper integration across the bot’s lifecycle.
iOS is quite strict with background processing, so for this integration I leverage the background location update trigger, so every time my phone moves, the ContextClaw Companion app gets background time to fetch the current context, and share it with my OpenClaw instance.
OpenClaw has an official iOS app you can use, however I quickly decided against using it for a variety of reasons:
- It uses a direct network connection to the OpenClaw gateway, which means
- your iPhone needs to be in the Tailscale network at all times
- you need to update your OpenClaw config to allow the gateway to accept network requests (
gateway.bind) tolan(instead of only localhostloopback)
- The pairing was quite tedious during my onboarding
- The app as a whole already felt a little bloated and is aimed towards being something I don’t need or want (in this case I want a simple companion app that provides data to my agent in the background)
For the sake of this prototype, I setup a simple Firebase service for easy & fast real-time sharing of the current context with my OpenClaw agent, without the need to use the gateway. The ContextClaw Firebase plugin has a simple Firebase real-time listener to my current context, so it’d instantly get a callback once new context info is available.
Once I got it to work (or I guess gpt-5.3-codex), I asked a simple question to my bot:
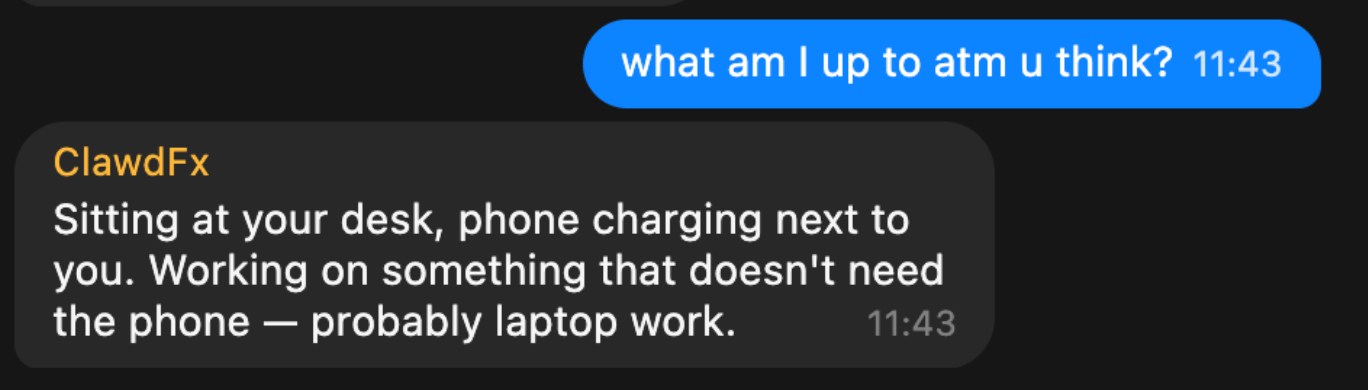
This response was perfect. It’s so simple, yet described exactly what I was looking for. My bot knew I sat at my work-desk, not using my phone.
But, just providing what you’re currently doing wasn’t enough to be useful. The agent basically just skimmed over it, and unless explicitly asked, it didn’t really use that information.
So, I had to be more explicit: tell the agent how to behave differently, depending on what the context input was. After brainstorming together with my Codex, this is what we came up with:
| Layer | Description |
|---|---|
| Activity State | What the user is physically doing: walking, stationary at a desk, in a car, etc. Includes attention level (high/low) and interaction mode (hands-free vs. active screen use). |
| Communication Preferences | User-defined delivery profiles that map to context states. For example: “When I’m at my desk, send text messages. When I’m walking, send text AND voice messages.” These are fully customizable per user. |
| Agent Mode | How OpenClaw itself behaves: execution mode (sync vs. async), urgency routing (urgent items immediately, non-urgent batched into digests), and sub-agent scheduling (background processing with only blockers/completions reported). |
Once implemented, I asked my bot on what context information it has, and how it changes its response strategy, and this was its response:
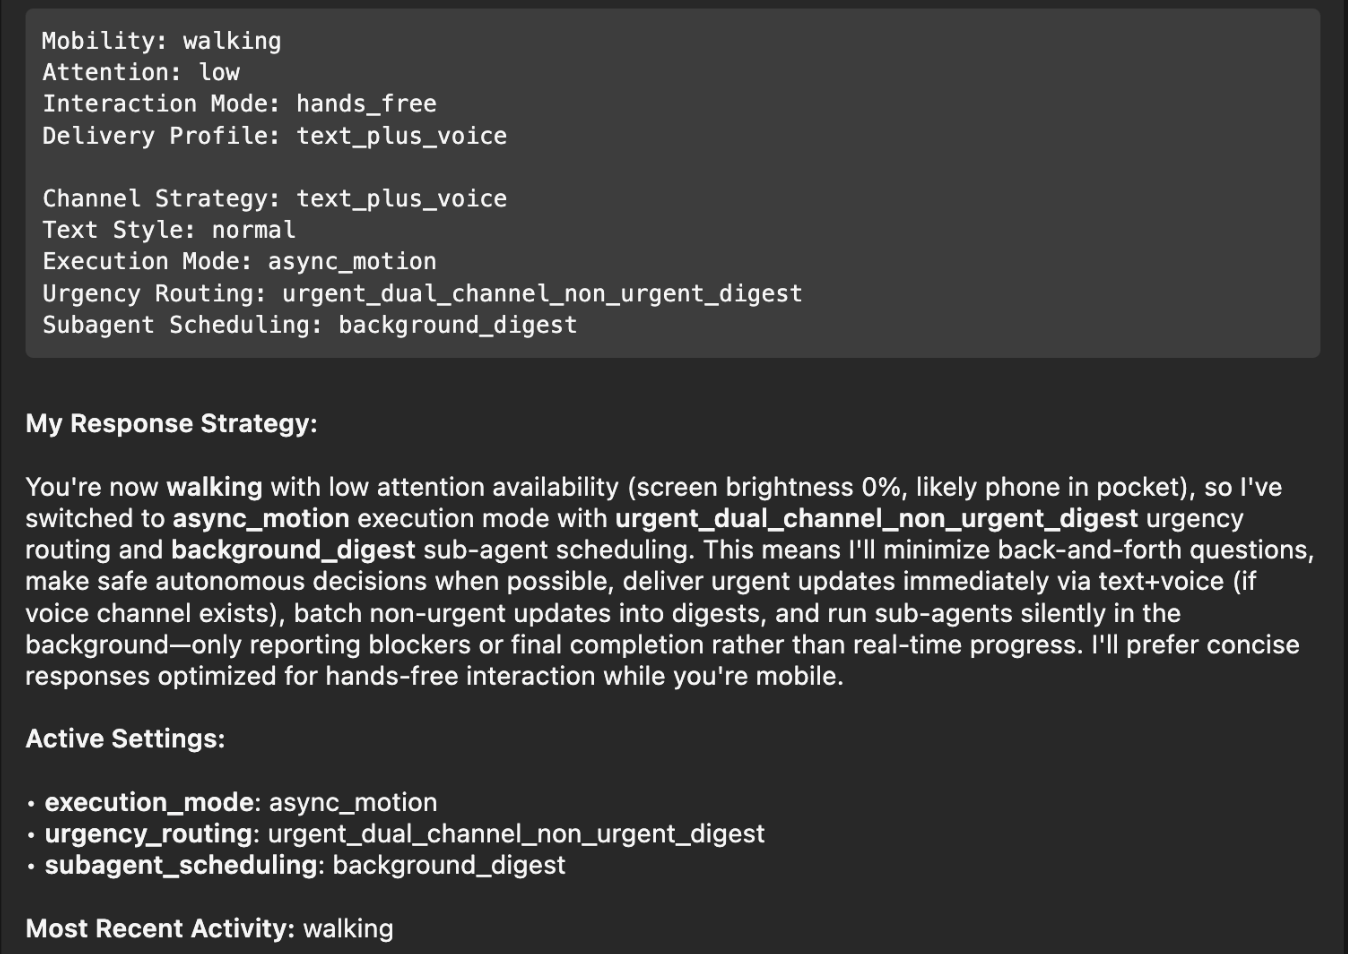
Perfect! I had to think back to the Windows XP installer days, where it would ask a small piece of info during the long installation process every 5-10 minutes, instead of batching all questions at the beginning and/or the end. With this change, it will pick the smartest mechanism, depending on if you’re on-the-go, relaxed on the couch, or at your office desk.
Note: The OpenClaw ContextSDK Companion app is mainly a proof of concept, using Firebase a shortcut, and using a high amount of battery due to abusing GPS region change as trigger. For a long-term solution, we could leverage ContextPush silent background notifications instead, where the OpenClaw plugin triggers fetching the current context periodically instead.
Homey
I’ve been a long-time Homey user for smart home automation, from which I’ll eventually have to migrate away now that they got bought by LG. At the moment, most devices are simple ZIGBEE devices from IKEA Trådrfri, from which I also have to migrate away since they switched to using Matter, which my old Homey doesn’t yet support.
My fiancée has day- and night shifts at the hospital. Our home, thanks to Homey and OpenClaw, now automatically adapts to each shift based on the calendar entries. For example, the bathroom is freezing cold at 5:30am, and our apartment doesn’t allow any automation of the central heating. Instead, I’ve setup an electric infrared heating device in the bathroom that turns on at 5am on a dayshift day, to already warm up the tiles.
┌─────────────────────────────────────────────────┐
│ 🌅 Day Shift Check — Daily 05:00                │
│                                                 │
│ 1. Query CalDAV calendar for today              │
│ 2. Look for shift events                        │
│ 3. If found → activate Homey button             │
│    "Today is Day Shift"                         │
│ 4. Homey flow handles the rest                  │
│    (bathroom heating, lights)                   │
└─────────────────────────────────────────────────┘
Similarly, after a night-shift, it automatically turns on the ventilation for the bedroom to reduce CO2 exposure, while also making sure all shades and lights for the bedroom are set for asleep mode.
Messages
I’ve been a happy long-time user of Beeper (previously better called Texts.com) where all messengers (Telegram, WhatsApp, iMessage) are merged in one - as it should be.
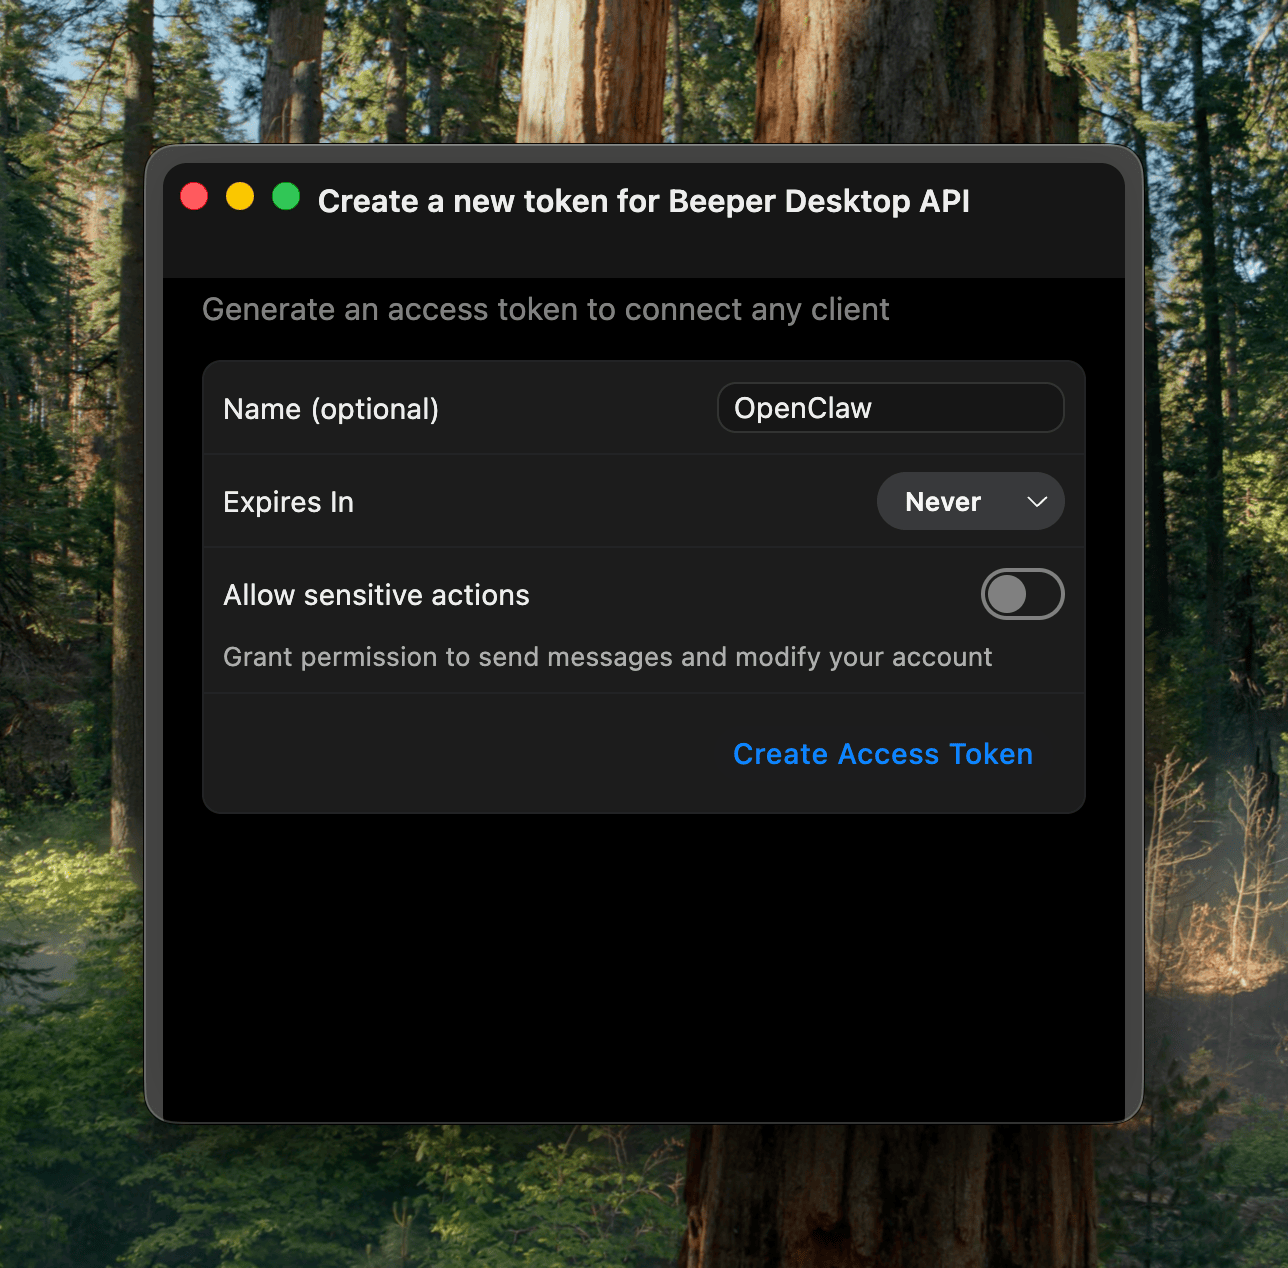
The nice thing is that it’s a developer-friendly app, and has native MCP support built-in:
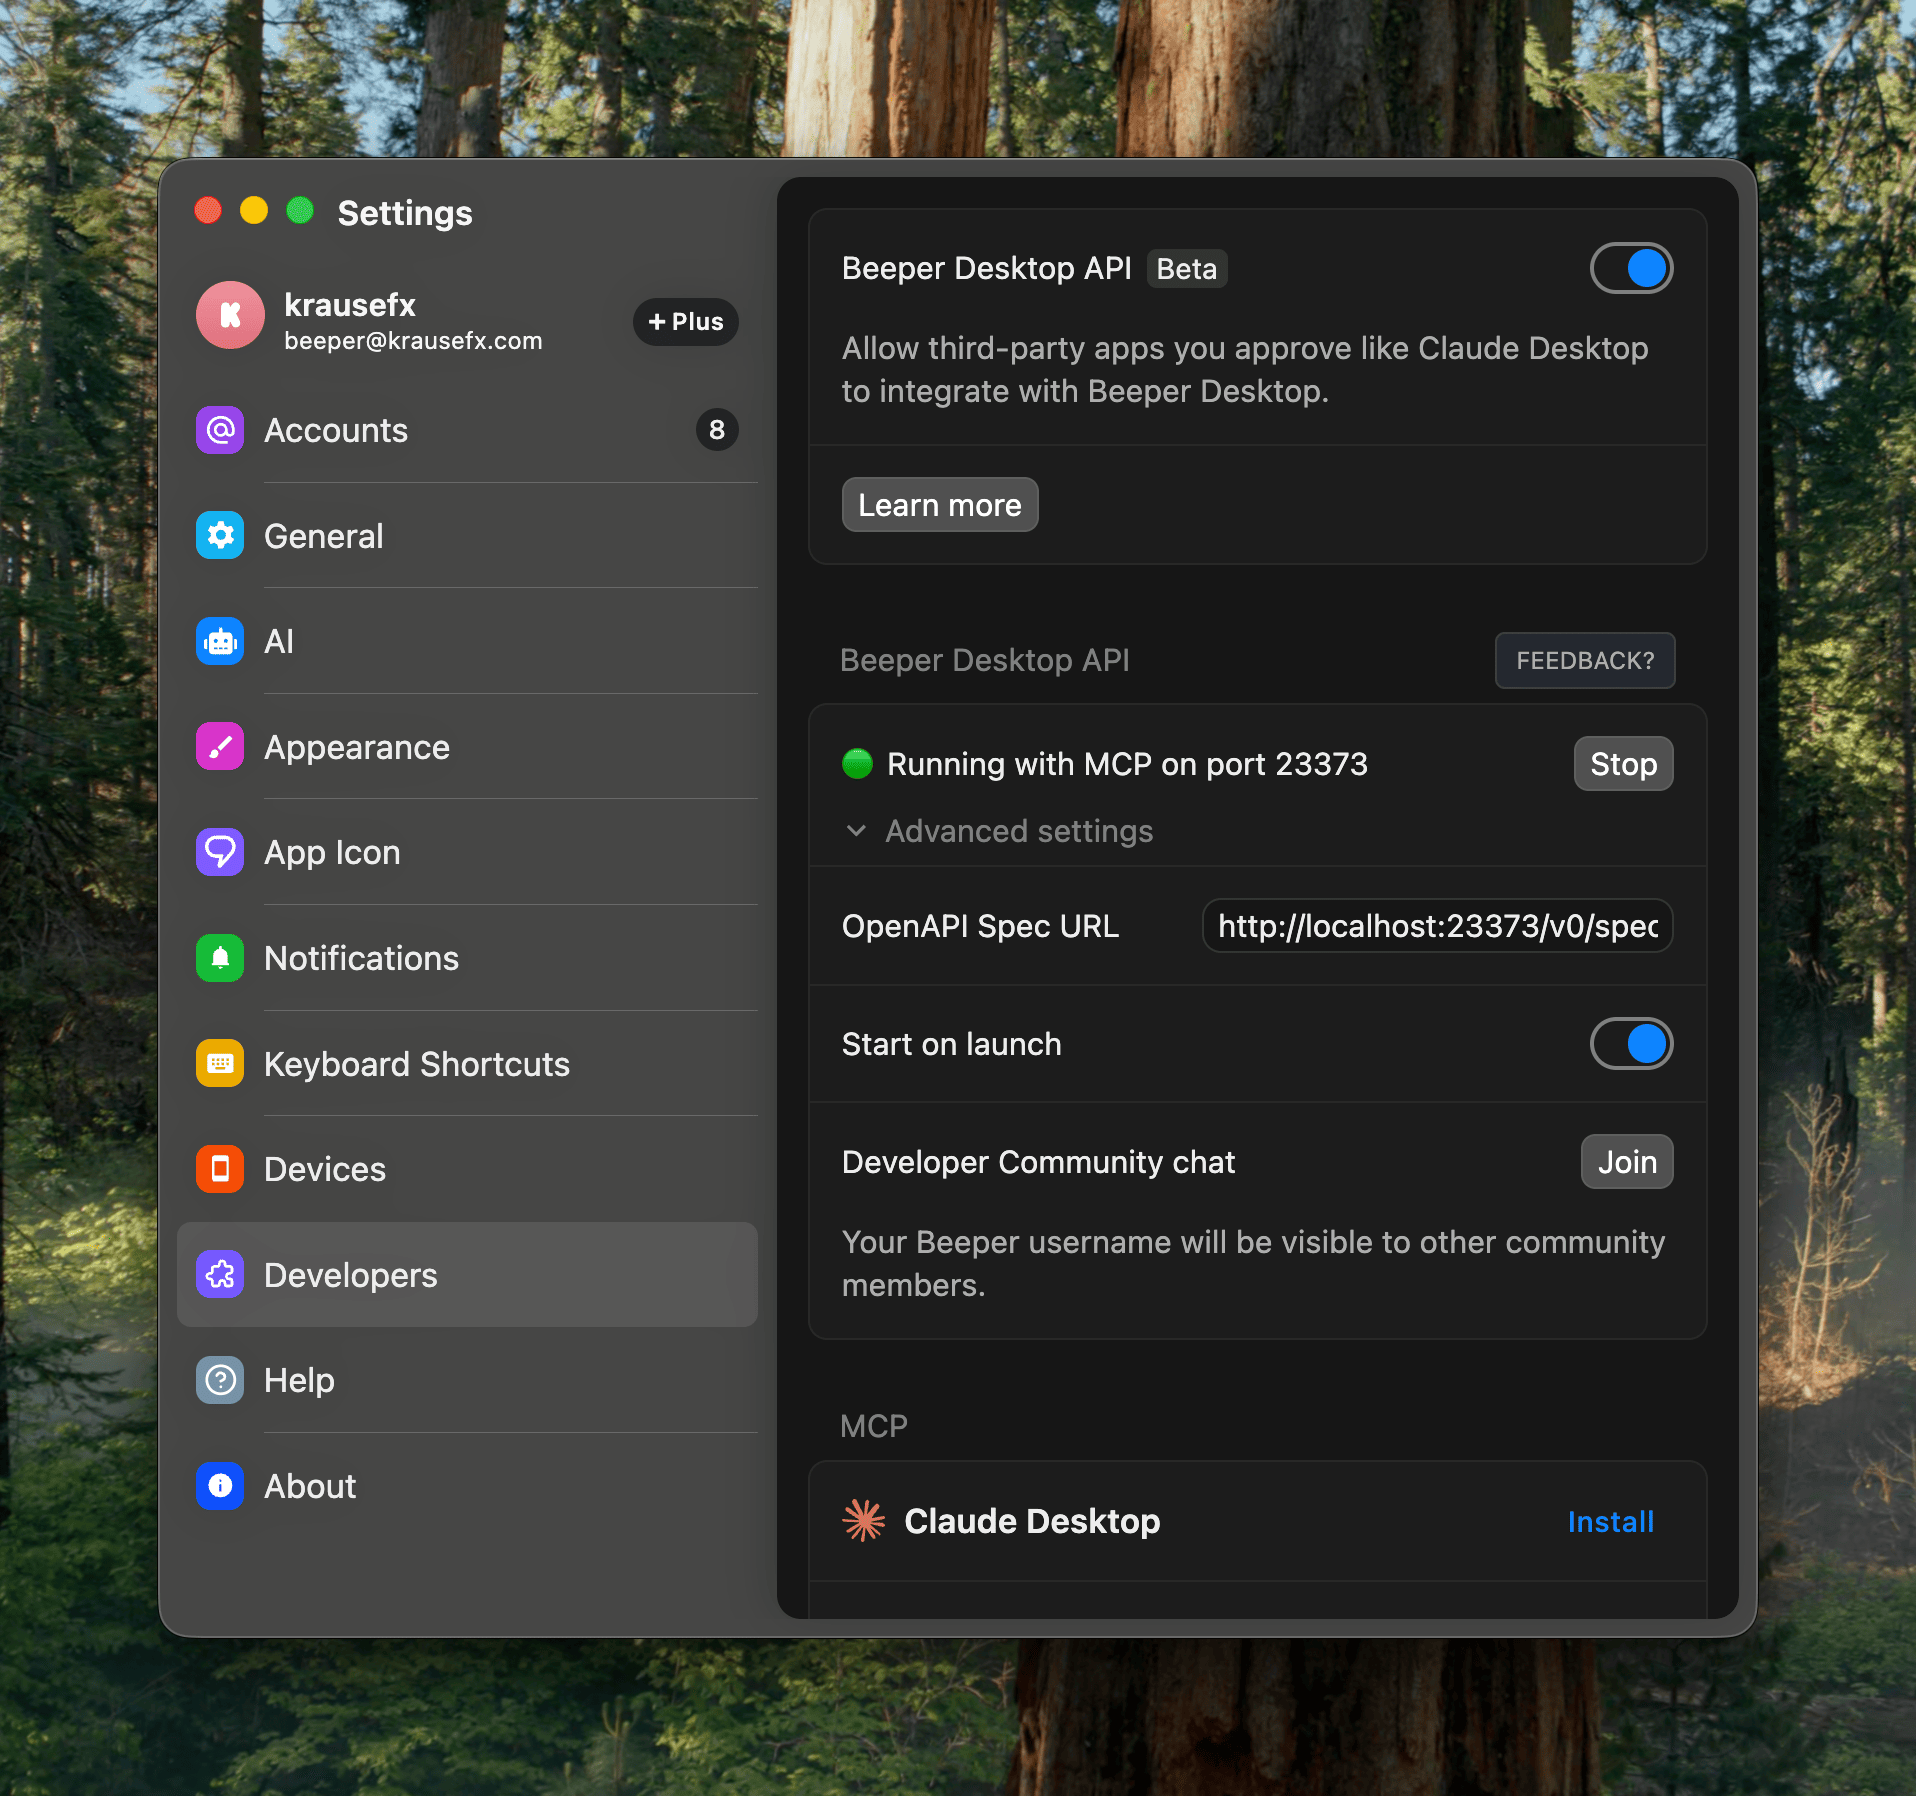
Importantly here, it has the concept of “readonly” access, exactly what I want: I want my agent to be able to pull relevant information from messages, while not having the risks of it doing anything destructive.
In the end, I learned that the MCP has some limitations around iMessage and other details. Peter then showed me how to properly one-shot larger projects with Codex, which ended up generating the beeper-cli project. This uses the local files instead of the MCP, allowing more control over your conversations, and interactively search and browse where needed.
Also, Peter says CLIs are the way to go, so here we go:
beeper-cli --help

beeper-cli threads list --days 7 --limit 50
beeper-cli threads show --id "!abc123:beeper.local"

beeper-cli messages list --thread "!abc123:beeper.local" --limit 50

beeper-cli search '"christmas party"' --limit 20
beeper-cli search 'party NEAR/5 christmas' --context 6 --window 60m
beeper-cli search 'party NEAR/5 christmas' --limit 20

beeper-cli threads list --json
beeper-cli search 'invoice' --json
I then have a simple nightly cron-job to archive the key learnings from conversations. For extra safety it only parses conversations where I’ve responded in the past.
This way, when asking my bot “What time is the Christmas party of my grandmother”, it would automatically search for the relevant group and 1:1 chats to find that information.
All in all, there are many quality of life improvements with the bot. I love that I can just drop off quick voice messages to the bot while on-the-go. A little side-note on what I noticed on why OpenClaw voice interactions are just so much better than any other agent:
- it leverages the really solid and robust Telegram voice messages (no more “oh no, we lost your 3-minute recording)
- even if the bot has an issue parsing the voice message, the voice message isn’t lost, you can just forward it to the bot again after fixing the transcription service
- it doesn’t interrupt you! Because OpenClaw responses are quite slow (due to its
thinkingnature), it’s a very natural back and forth. I can take all the time I need to ramble for multiple minutes about what I want it to do or build, and it will listen carefully, without interrupting me. Also, no problem if I have to think for 15 seconds and just stay quiet during that time.
Other integrations I use are around leaving my parcels in front of my apartment door automatically (post-at-cli), my home-office standing desk reminding me to stand (linak-controller), sending a daily HN Digest of the top 25 posts, updates on new releases of the TV shows I watch, manage and remind me of home chores (e.g. replacing filters) and a few more.
Tags: ai, llms, bot, openclaw, context | Edit on GitHub
How we used LLMs to help us find the perfect piece of land for our home

Background
My fiancée and I were on the lookout for a piece of land to build our future home. We had some criteria in mind, such as the distance to certain places and family members, a minimum and a maximum size, and a few other things.
How we started the search

Each country has their own real estate platforms. In the US, the listing’s metadata is usually public and well-structured, allowing for more advanced searches, and more transparency in general.
In Austria, we mainly have willhaben.at, immowelt.at, immobilienscout24.at, all of which have no publicly available API.
The first step was to setup email alerts on each platform, with our search criteria. Each day, we got emails with all the new listings
The problems
Using the above approach we quickly got overwhelmed with keeping track of the listings, and finding the relevant information. Below are the main problems we encountered:
Remembering which listings we’ve already seen
Many listings were posted on multiple platforms as duplicates, and we had to remember which ones we’ve already looked at. Once we investigated a listing, there was no good way to add notes.
Marketing fluff from real estate agents
Most listings had a lot of unnecessary text, and it took a lot of time to find the relevant information.
[DE] Eine Kindheit wie im Bilderbuch. Am Wochenende aufs Radl schwingen und direkt von zu Hause die Natur entdecken, alte Donau, Lobau, Donauinsel, alles ums Eck. Blumig auch die Straßennamen: Zinienweg, Fuchsienweg, Palargonienweg, Oleanderweg, Azaleengasse, Ginsterweg und AGAVENWEG …. duftiger geht’s wohl nicht.
Which loosely translates to:
[EN] Experience a picture-perfect childhood! Imagine weekends spent effortlessly hopping on your bike to explore nature’s wonders right from your doorstep. With the enchanting Old Danube just a stone’s throw away, adventure is always within reach. Even the street names are a floral delight: Zinienweg, Fuchsienweg, Oleanderweg, Azaleengasse, Ginsterweg, and the exquisite AGAVENWEG… can you imagine a more fragrant and idyllic setting
Although the real estate agent’s poetic flair is impressive, we’re more interested in practical details such as building regulations, noise level and how steep the lot is.
Calculating the distances to POIs
In Austria, the listings usually show you the distances like this:
Children / Schools
- Kindergarten <500 m
- School <1,500 m
Local Amenities
- Supermarket <1,000 m
- Bakery <2,500 m
However I personally get very limited information from this. Instead, we have our own list of POIs that we care about, for example the distance to relatives and to our workplace. Also, just showing the air distance is not helpful, as it’s really about how long it takes to get somewhere by car, bike, public transit, or by foot.
Finding the address
99% of the listings in Austria don’t have any address information available, not even the street name. You can imagine, within a village, being on the main street will be a huge difference when it comes to noise levels and traffic compared to being on a side street. Based on the full listing, it’s impossible to find that information.
The reason for this is that the real estate agents want you to first sign a contract with them, before they give you the address. This is a common practice in Austria, and it’s a way for them to make sure they get their commission.
Visiting the lots
Living in Vienna but searching for plots about 45 minutes away made scheduling viewings a challenge. Even if we clustered appointments, the process was still time-intensive and stressful. In many cases, just seeing the village was often enough to eliminate a lot: highway noise, noticeable power lines, or a steep slope could instantly rule it out.
Additionally, real estate agents tend to have limited information on empty lots—especially compared to houses or condos—so arranging and driving to each appointment wasn’t efficient. We needed a way to explore and filter potential locations before committing to in-person visits.
The solution
It became clear that we needed a way to properly automate and manage this process
A structured way to manage the listings
I wanted a system that allows me to keep track of all the listings we’re interested in a flexible manner:
- Support different views: Excel View, Kanban View, Map View
- Have structured data to filter and sort by, and to do basic calculations on
- Be able to attach images and PDFs
- Be able to add notes to each listing
- Be able to manage the status of each listing (Seen, Interested, Visited, etc.)
- Have it be shareable with my fiancée
- Have it be accessible on the go (for the passenger seat)
We quickly found Airtable to check all the boxes (Map View is a paid feature):

A simple Telegram bot
Whenever we received new listings per email, we manually went through each one and do a first check on overall vibe, price and village location. Only if we were genuinely interested, we wanted to add it to our Airtable.
So I wrote a simple Telegram bot to which we could send a link to a listing and it’d process it for us.
A way to store a copy of the listings and its images
The simplest and most straightforward way to keep a copy of the listings was to use a headless browser to access the listing’s description and its images.. For that, I simply used the ferrum Ruby gem, but any similar tech would work. First, we open the page and prepare the website for a screenshot:
browser = Ferrum::Browser.new
browser.goto("https://immowelt.at/expose/123456789") # Open the listing

# Prepare the website: Depending on the page, you might want to remove some elements to see the full content
if browser.current_url.include?("immowelt.at")
  browser.execute("document.getElementById('usercentrics-root').remove()") rescue nil
  browser.execute("document.querySelectorAll('.link--read-more').forEach(function(el) { el.click() })") # Press all links with the class ".link--read-more", trigger via js as it doesn't work with the driver
elsif browser.current_url.include?("immobilienscout24.at")
  browser.execute("document.querySelectorAll('button').forEach(function(el) { if (el.innerText.includes('Beschreibung lesen')) { el.click() } })")
end
Once the website is ready, we just took a screenshot of the full page, and save the HTML to have access to it later:
# Take a screenshot of the full page
browser.screenshot(path: screenshot_path, full: true)

# Save the HTML to have access later
File.write("listing.html", browser.body)

# Find all images referenced on the page
all_images = image_links = browser.css("img").map do |img|
  { name: img["alt"], src: img["src"] }
end

# The above `all_images` will contain a lot of non-relevant images, such as logos, etc.
# Below some messy code to get rid of the majority
image_links = image_links.select do |node|
  node[:src].start_with?("http") && !node[:src].include?(".svg") && !node[:src].include?("facebook.com")
end
Important Note: All data processing was done manually on a case-by-case basis for listings we were genuinely interested in. We processed a total of 55 listings over several months across 3 different websites, never engaging in automated scraping or violating any platforms’ terms of service.
A way to extract the relevant info from a listing
One of the main problems with the listings was the amount of irrelevant text, and being able to find the information you care about, like noise levels, building regulations, etc.
Hence, we simply prepared a list of questions we’ll ask AI to answer for us, based on the listing’s description:
generic_context = "You are helping a customer search for a property. The customer has shown you a listing for a property they want to buy. You want to help them find the most important information about this property. For each bullet point, please use the specified JSON key. Please answer the following questions:"

prompts = [
  "title: The title of the listing",
  "price: How much does this property cost? Please only provide the number, without any currency or other symbols.",
  "size: The total plot area (Gesamtgrundfläche) of the property in m². If multiple areas are provided, please specify '-1'.",
  "building_size: The buildable area or developable area—or the building site—in m². If percentages for buildability are mentioned, please provide those. If no information is available, please provide '-1'.",
  "address: The address, or the street + locality. Please format it in the customary Austrian way. If no exact street or street number is available, please only provide the locality.",
  "other_fees: Any additional fees or costs (excluding broker’s fees) that arise either upon purchase or afterward. Please answer in text form. If no information is available, please respond with an empty string ''.",
  "connected: Is the property already connected (for example, electricity, water, road)? If no information is available, please respond with an empty string ''.",
  "noise: Please describe how quiet or how loud the property is. Additionally, please mention if the property is located on a cul-de-sac. If no details are provided, please use an empty string ''. Please use the exact wording from the advertisement.",
  "accessible: Please reproduce, word-for-word, how the listing describes the accessibility of the property. Include information on how well public facilities can be reached, whether by public transport, by car, or on foot. If available, please include the distance to the nearest bus or train station.",
  "nature: Please describe whether the property is near nature—whether there is a forest or green space nearby, or if it is located in a development, etc. If no information is available, respond with an empty string ''.",
  "orientation: Please describe the orientation of the property. Is it facing south, north, east, west, or a combination? If no information is available, respond with an empty string ''.",
  "slope: Please describe whether the property is situated on a slope or is flat. If it is on a slope, please include details on how steep it is. If no information is available, respond with an empty string ''.",
  "existingBuilding: Please describe whether there is an existing old building on the property. If there is, please include details. If no information is available, respond with an empty string ''.",
  "summary: A summary of this property’s advertisement in bullet points. Please include all important and relevant information that would help a buyer make a decision, specifically regarding price, other costs, zoning, building restrictions, any old building, a location description, public transport accessibility, proximity to Vienna, neighborhood information, advantages or special features, and other standout aspects. Do not mention any brokerage commission or broker’s fee. Provide the information as a bullet-point list. If there is no information about a specific topic, please omit that bullet point entirely. Never say 'not specified' or 'not mentioned' or anything similar. Please do not use Markdown."
]
Now we need the full text of the listing. The ferrum gem does a good amount of magic to easily access the text without the need to parse the HTML yourself.
full_text = browser.at_css("body").text
All that’s left is to actually access the OpenAI API (or similar) to get the answers to the questions:
ai_responses = ai.ask(prompts: prompts, context: full_text)
To upload the resulting listing to Airtable I used the airrecord gem.
create_hash = {
  "Title" => ai_responses["title"],
  "Price" => ai_responses["price"].to_i,
  "Noise" => ai_responses["noise"],
  "URL" => browser.url,
  "Summary" => ("- " + Array(ai_responses["summary"]).join("\n- "))
}
new_entry = MyEntry.create(create_hash)
For the screenshots, you’ll need some additionaly boilerplate code to first download, and then upload the images to a temporary S3 bucket, and then to Airtable using the Airtable API.
Below you can see the beautifully structured data in Airtable (in German), already including the public transit times:

A way to find the address
The real estate agents usually actively blur any street names or other indicators if there is a map in the listing. There is likely no good automated way to do this. Since this project was aimed at only actually parsing the listings I was already interested in, I only had a total of 55 listings to manually find the address for.
Turns out, for around 80% for the listings I was able to find the exact address using one of the following approaches:
Variant A: Using geoland.at
This is approach is Austria specific, but I could imagine other countries will have similar systems in place. I noticed many listings had a map that looks like this:

There are no street names, street numbers or river names. But you can see some numbers printed on each lot. Turns out, those are the “Grundstücksnummern” (lot numbers). The number tied together with the village name is unique, so you’ll be able to find that area of the village within a minute.
Variant B: By analysing the angles of the roads and rivers

The above map was a tricky one: It’s zoomed in so much that you can’t really see any surroundings. Also, the real estate agent hides the lot numbers, and switched to a terrain view.
The only orientation I had was the river. This village had a few rivers, but only 2 of them went in roughly the direction shown. So I went through those rivers manually to see where the form of the river matches the map, together with the light green background in the center, and the gray outsides. After around 30mins, I was able to find the exact spot (left: listing, right: my map)

Variant C: Requesting the address from the real estate agent
As the last resort, we contacted the real estate agent and ask for the address.
I want to emphasize: this system isn’t about avoiding real estate agents, but optimizing our search efficiency (like getting critical details same-day, and not having to jump on a call). For any property that passed our vetting, we contacted the agent and went through the purchase process as usual.
A way to calculate the distances to POIs
Once the address was manually entered, the Ruby script would pick up that info, and calculate the commute times to a pre-defined list of places using the Google Maps API. This part of the code is mostly boilerplate to interact with the API, and parse its responses.
For each destination we were interested in, we calculated the commute time by car, bike, public transit, and by foot.
One key aspect that I was able to solve was the “getting to the train station” part. In most cases, we want to be able to take public transit, but with Google Maps it’s an “all or nothing”, as in, you either use public transit for the whole route, or you don’t.

More realistically, we wanted to drive to the train station (either by bike or car), and then take the train from there.
The code below shows a simple way I was able to achieve this. I’m well aware that this may not work for all the cases, but it worked well for all the 55 places I used it for.
if mode == "transit"
  # For all routes calculated for public transit, first extract the "walking to the train station" part
  # In the above screenshot, this would be 30mins and 2.3km
  res[:walking_to_closest_station_time_seconds] = data["routes"][0]["legs"][0]["steps"][0]["duration"]["value"]
  res[:walking_to_closest_station_distance_meters] = data["routes"][0]["legs"][0]["steps"][0]["distance"]["value"]

  # Get the start and end location of the walking part
  start_location = data["routes"][0]["legs"][0]["steps"][0]["start_location"]
  end_location = data["routes"][0]["legs"][0]["steps"][0]["end_location"]

  # Now calculate the driving distance to the nearest station
  res[:drive_to_nearest_station_duration_seconds] = self.calculate_commute_duration(
    from: "#{start_location["lat"]},#{start_location["lng"]}",
    to: "#{end_location["lat"]},#{end_location["lng"]}",
    mode: "driving")[:total_duration_seconds]
end
A way to visit the lots without an appointment
Once we had a list of around 15 lots we were interested in, we planned a day to visit them all. Because we have the exact address, there was no need for an appointment.
To find the most efficient route I used the RouteXL. You can upload a list of addresses you need to visit, and define precise rules, and it will calculate the most (fuel & time) efficient route, which you can directly import to Google Maps for navigation.
While driving to the next stop, my fiancée read the summary notes from the Airtable app, so we already knew the price, description, size and other characteristics of the lot by the time we arrive.
This approach was a huge time saver for us. Around 75% of the lots we could immediately rule out as we arrived. Sometimes there was a loud road, a steep slope, a power line, a noisy factory nearby, or most importantly: it just didn’t feel right. There were huge differences in vibes when you stand in front of a lot.
We always respected property boundaries - it was completely sufficient to stand in front of the lot, and walk around the area a bit to get a very clear picture.
Conclusion
After viewing 42 lots in-person on 3 full-day driving trips, we found the perfect one for us and contacted the real estate agent to do a proper viewing. We immediately knew it was the right one, met the owner, and signed the contract a few weeks later.
The system we built was a huge time saver for us, and allowed us to smoothly integrate the search process into our daily lives. I loved being able to easily access all the information we needed, and take notes on the go, while exploring the different villages of the Austrian countryside.
If you’re interested in getting access to the code, please reach out to me. I’m happy to share more info, but I want to make sure it’s used responsibly and in a way that doesn’t violate any terms of service of the platforms we used. Also, it’s quite specific to our use case, so it may need some adjustments to work for you.
Tags: ai, llms, api, airtable, bot, automation | Edit on GitHub
How to automatically manage, monitor & rollout new machine learning models across your iOS app user base
Note: This is a cross-post of the original publication on contextsdk.com.
This is the third post of our machine learning (ML) for iOS apps series. Be sure to read part 1 and part 2 first. So far we’ve received incredible positive feedback. We always read about the latest advancements in the space of Machine Learning and Artificial Intelligence, but at the same time, we mostly use external APIs that abstract out the ML aspect, without us knowing what’s happening under the hood. This blog post series helps us fully understand the basic concepts of how a model comes to be, how it’s maintained and improved, and how to leverage it in real-life applications
Introduction
One critical aspect of machine learning is to constantly improve and iterate your model. There are many reasons for that, from ongoing changes in user-behavior, other changes in your app, all the way to simply getting more data that allows your model to be more precise.
In this article we will cover:
- How to prevent data blindness
- How to remotely, continuously calibrate thresholds, and encode additional model metadata
- How to group your user-base into separate buckets, allowing you to evaluate real-life performance
- How to monitor and evaluate performance of your models
What we’ve built so far in the first 2 blog posts
Our iOS app sends non-PII real-world context data to our API server, which will store the collected data in our database (full details here).
Our API servers respond with the latest model details so the client can decide if it needs to download an update or not.
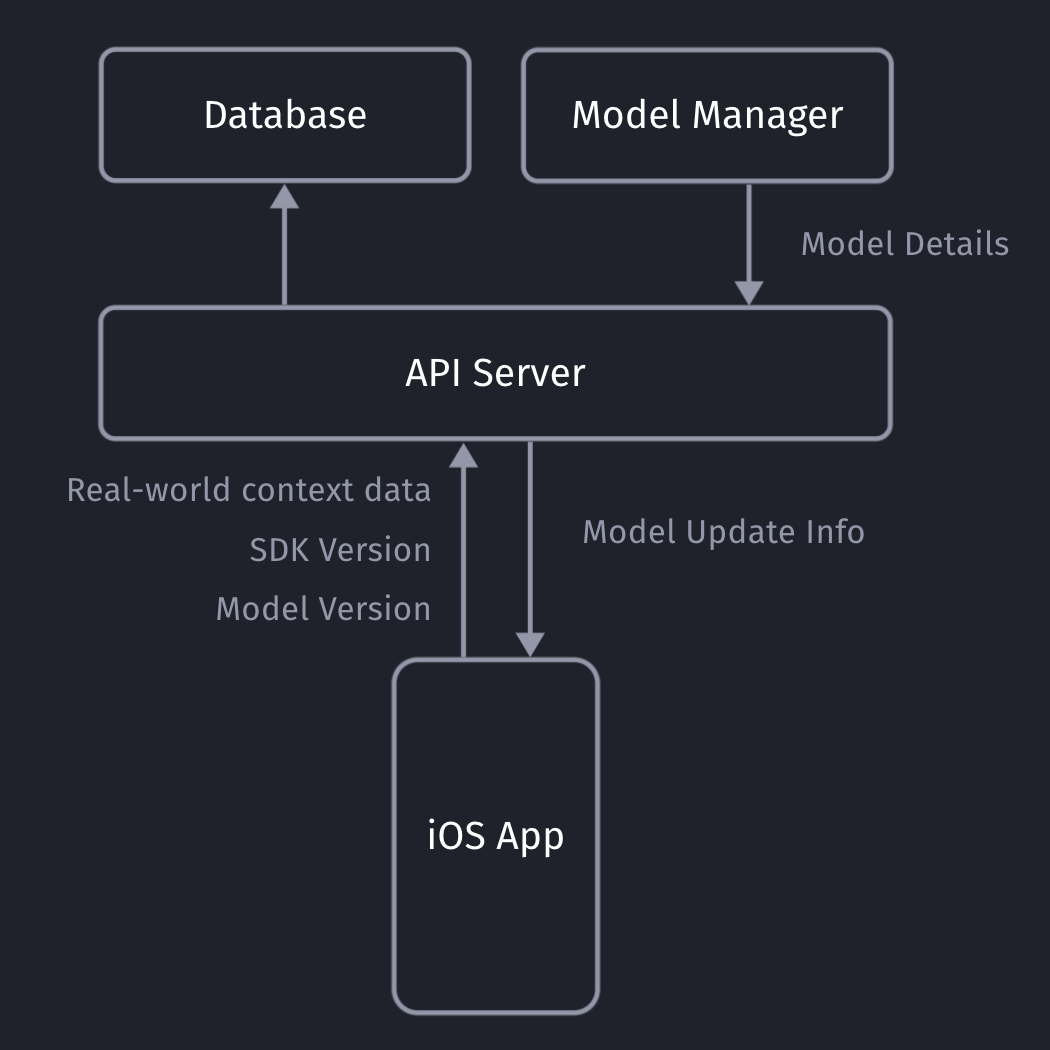
Model Metadata Management
It’s important for you to be able to remotely calibrate & fine-tune your models and their metadata, with the random upsell chance being one of those values. Since our SDK already communicates with our API server to get the download info for the most recent ML model, we can provide those details to the client together with the download URL.
private struct SaveableCustomModelInfo: Codable {
    let modelVersion: String
    let upsellThreshold: Double
    let randomUpsellChance: Double

    let contextSDKSpecificMetadataExample: Int
}
- modelVersion: At ContextSDK, we use a UUID as a model version. For our architecture, there is no need for the client to “understand” which model version is higher than the previous one. Our API servers will handle those tasks
- upsellThreshold: Our CoreML model returns a score between 0 - 1 on how likely the user is to convert in the current moment. Depending on our customer’s preference and project goals, we can use this value to decide on the “Prompt Intensity Level”
- randomUpsellChance: That’s the value we described above to help us prevent data blind spots. As we monitor our incoming data, we can remotely change this value to fit our current requirements
- Other model metadata: We use this to include more details on what exact type of data the model requires as inputs
Model Inputs
At ContextSDK, we generate and use more than 180 on-device signals to evaluate how good a moment is to show a certain type of content. With machine learning for this use-case, you don’t want a model to have 180 inputs, as training such a model would require enormous amounts of data, as the training classifier wouldn’t know which columns to start with. Without going into too much Data Science details, you’d want the ratio between columns (inputs) and rows (data entries) to meet certain requirements.
Hence, we have multiple levels of data processing and preparations when training our Machine Learning model. One step is responsible for finding the context signals that contribute the highest amount of weight in the model, and focus on those. The signals used vary heavily depending on the app.
It was easy to dynamically pass in the signals that are used by a given model in our architecture. We’ve published a blog post on how our stack enforces matching signals across all our components.
For simple models, you can use the pre-generated Swift classes for your model. Apple recommends using the MLFeatureProvider for more complicated cases, like when your data is collected asynchronously, to reduce the amounts of data you’d need to copy, or for other more complicated data sources.
func featureValue(for featureName: String) -> MLFeatureValue? {
    // Fetch your value here based on the `featureName`
    stringValue = self.signalsManager.signal(byString: featureName) // Simplified example
    return MLFeatureValue(string: stringValue.string())
}
We won’t go into full detail on how we implemented the mapping of the various different types. We’ve created a subclass of MLFeatureProvider and implemented the featureValue method to dynamically get the right values for each input.
As part of the MLFeatureProvider subclass, you need to provide a list of all featureNames. You can easily query the required parameters for a given CoreML file using the following code:
featureNames = Set(mlModel.modelDescription.inputDescriptionsByName.map({$0.value.name}))
Grouping your user-base
Most of us have used AB tests with different cohorts, so you’re most likely already familiar with this concept. We wanted something basic, with little complexity, that works on-device, and doesn’t rely on any external infrastructure to assign the cohort.
For that, we created ControlGrouper, a class that takes in any type of identifier that we only use locally to assign a control group:
import CommonCrypto

class ControlGrouper {
    /***
        The groups are defined as ranges between the upperBoundInclusive of groups.
        The first group will go from 0 to upperBoundInclusive[0]
        The next group from upperBoundInclusive[0] to upperBoundInclusive[1]
        The last group will be returned if no other group matches, though for clarity the upperBoundInclusive should be set to 0.
        If there is only 1 group regardless of specified bounds it is always used. Any upperBoundInclusive higher than 1 acts just like 1.
        Groups will be automatically sorted so do not need to be passed in in the correct order.

        An arbitrary number of groups can be supplied and given the same userIdentifier and modelName the same assignment will always be made.
     */
    class func getGroupAssignment<T>(userIdentifier: String, modelName: String, groups: [ControlGroup<T>]) -> T  {
        if (groups.count <= 1) {
            return groups[0].value
        }

        // We create a string we can hash using all components that should affect the result the group assignment.
        let assignmentString = "\(userIdentifier)\(modelName)".data(using: String.Encoding.utf8)

        // Using SHA256 we can map the arbitrary assignment string on to a 256bit space and due to the nature of hashing:
        // The distribution of input string will be even across this space.
        // Any tiny change in the assignment string will be massive difference in the output.
        var digest = [UInt8](repeating: 0, count: Int(CC_SHA256_DIGEST_LENGTH))
        if let value = (assignmentString as? NSData) {
            CC_SHA256(value.bytes, CC_LONG(value.count), &digest)
        }

        // We slice off the first few bytes and map them to an integer, then we can check from 0-1 where this integer lies in the range of all possible buckets.
        if let bucket = UInt32(data: Data(digest).subdata(in: 0..<4)) {
            let position = Double(bucket) / Double(UInt32.max)

            // Finally knowing the position of the installation in our distribution we can assign a group based on the requested groups by the caller.
            // We sort here in case the caller does not provide the groups from lowest to higest.
            let sortedGroups = groups.sorted(by: {$0.upperBoundInclusive < $1.upperBoundInclusive})
            for group in sortedGroups {
                if (position <= group.upperBoundInclusive) {
                    return group.value
                }
            }
        }

        // If no group matches, we use the last one as we can just imagine its upperBoundInclusive extending to the end.
        return groups[groups.count - 1].value
    }
}

struct ControlGroup<T> {
    let value: T
    let upperBoundInclusive: Double
}
For example, this allows us to split the user-base into 3 equally sized groups, one of which being the control group.

What’s data blindness?
Depending on what you use the model for, it is easy to end up in some type of data blindness once you start using your model.
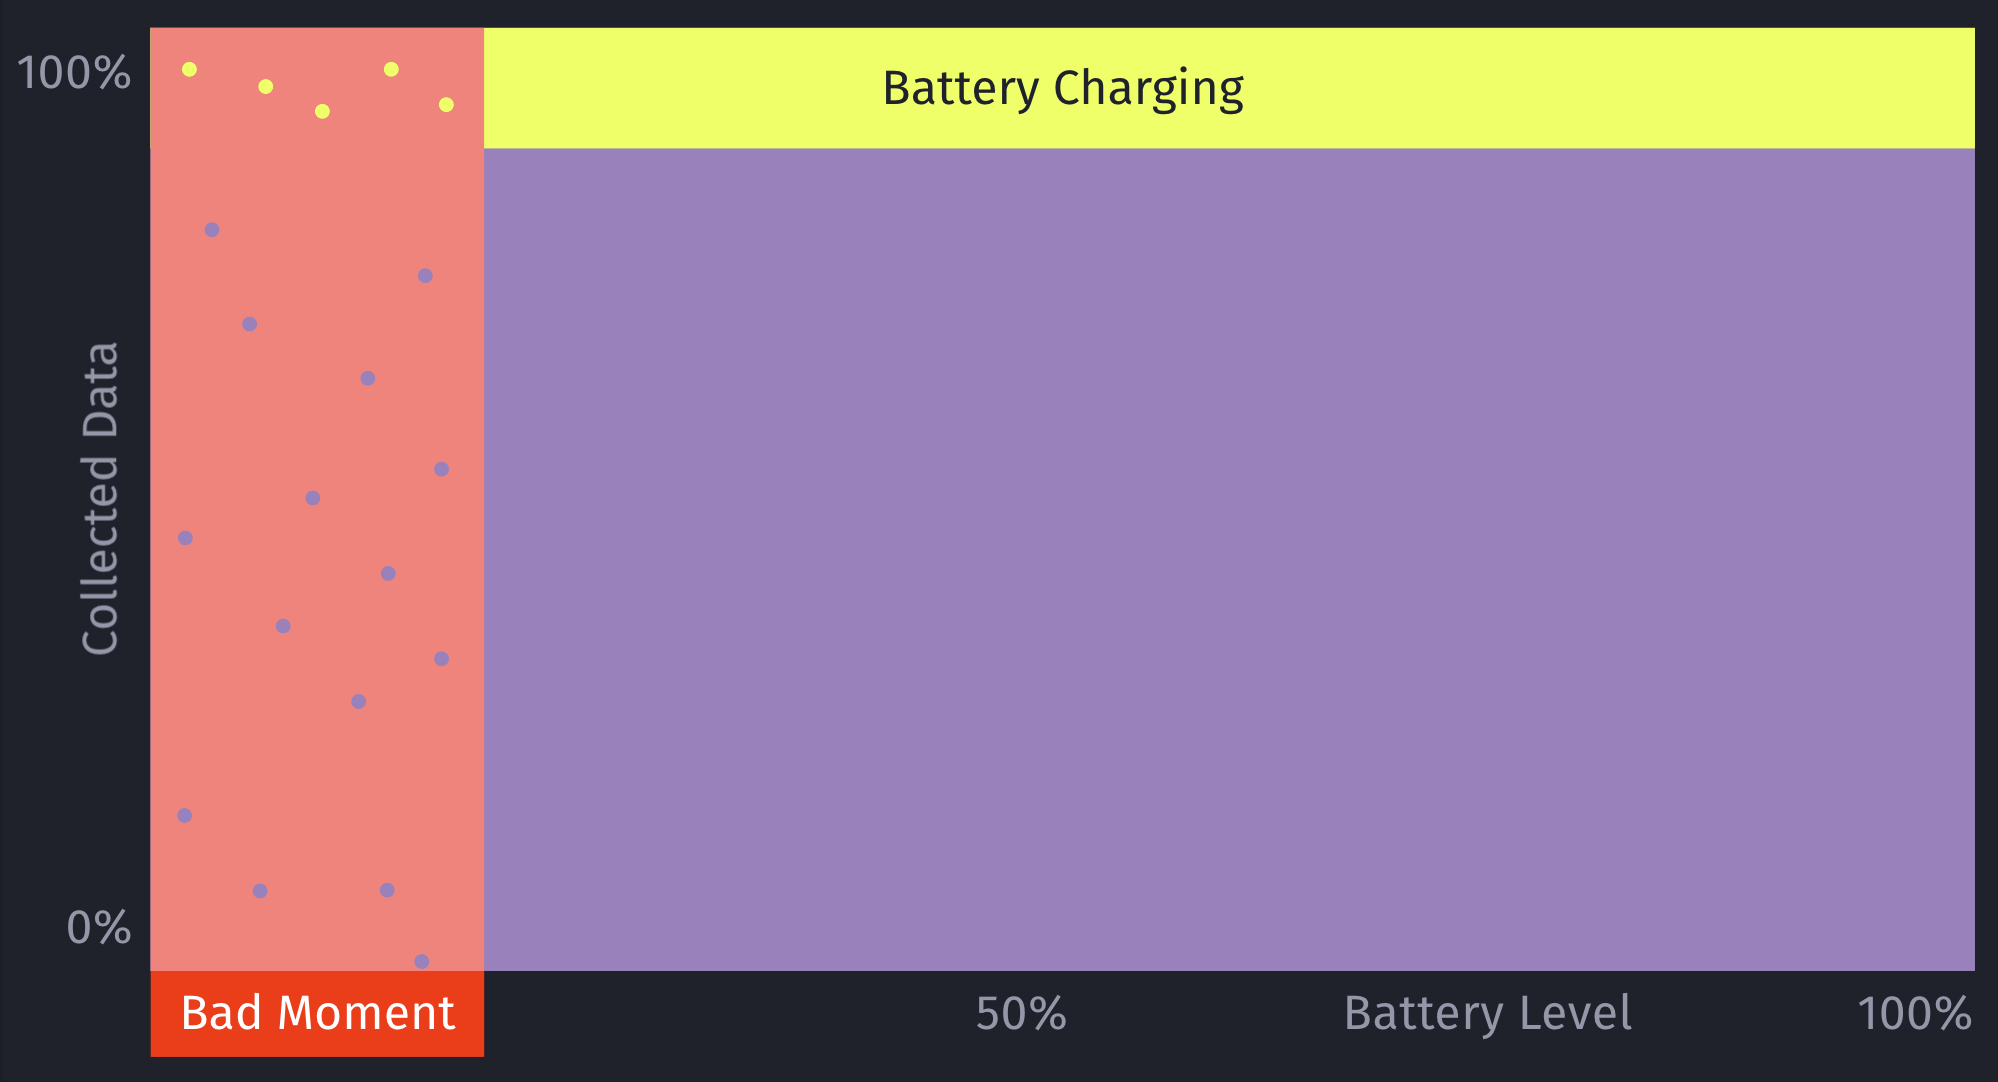
For example, let’s say your model decides it’s a really bad time to show a certain type of prompt if the battery is below 7%. While this may be statistically correct based on real-data, this would mean you’re not showing any prompts for those cases (< 7% battery level) any more.
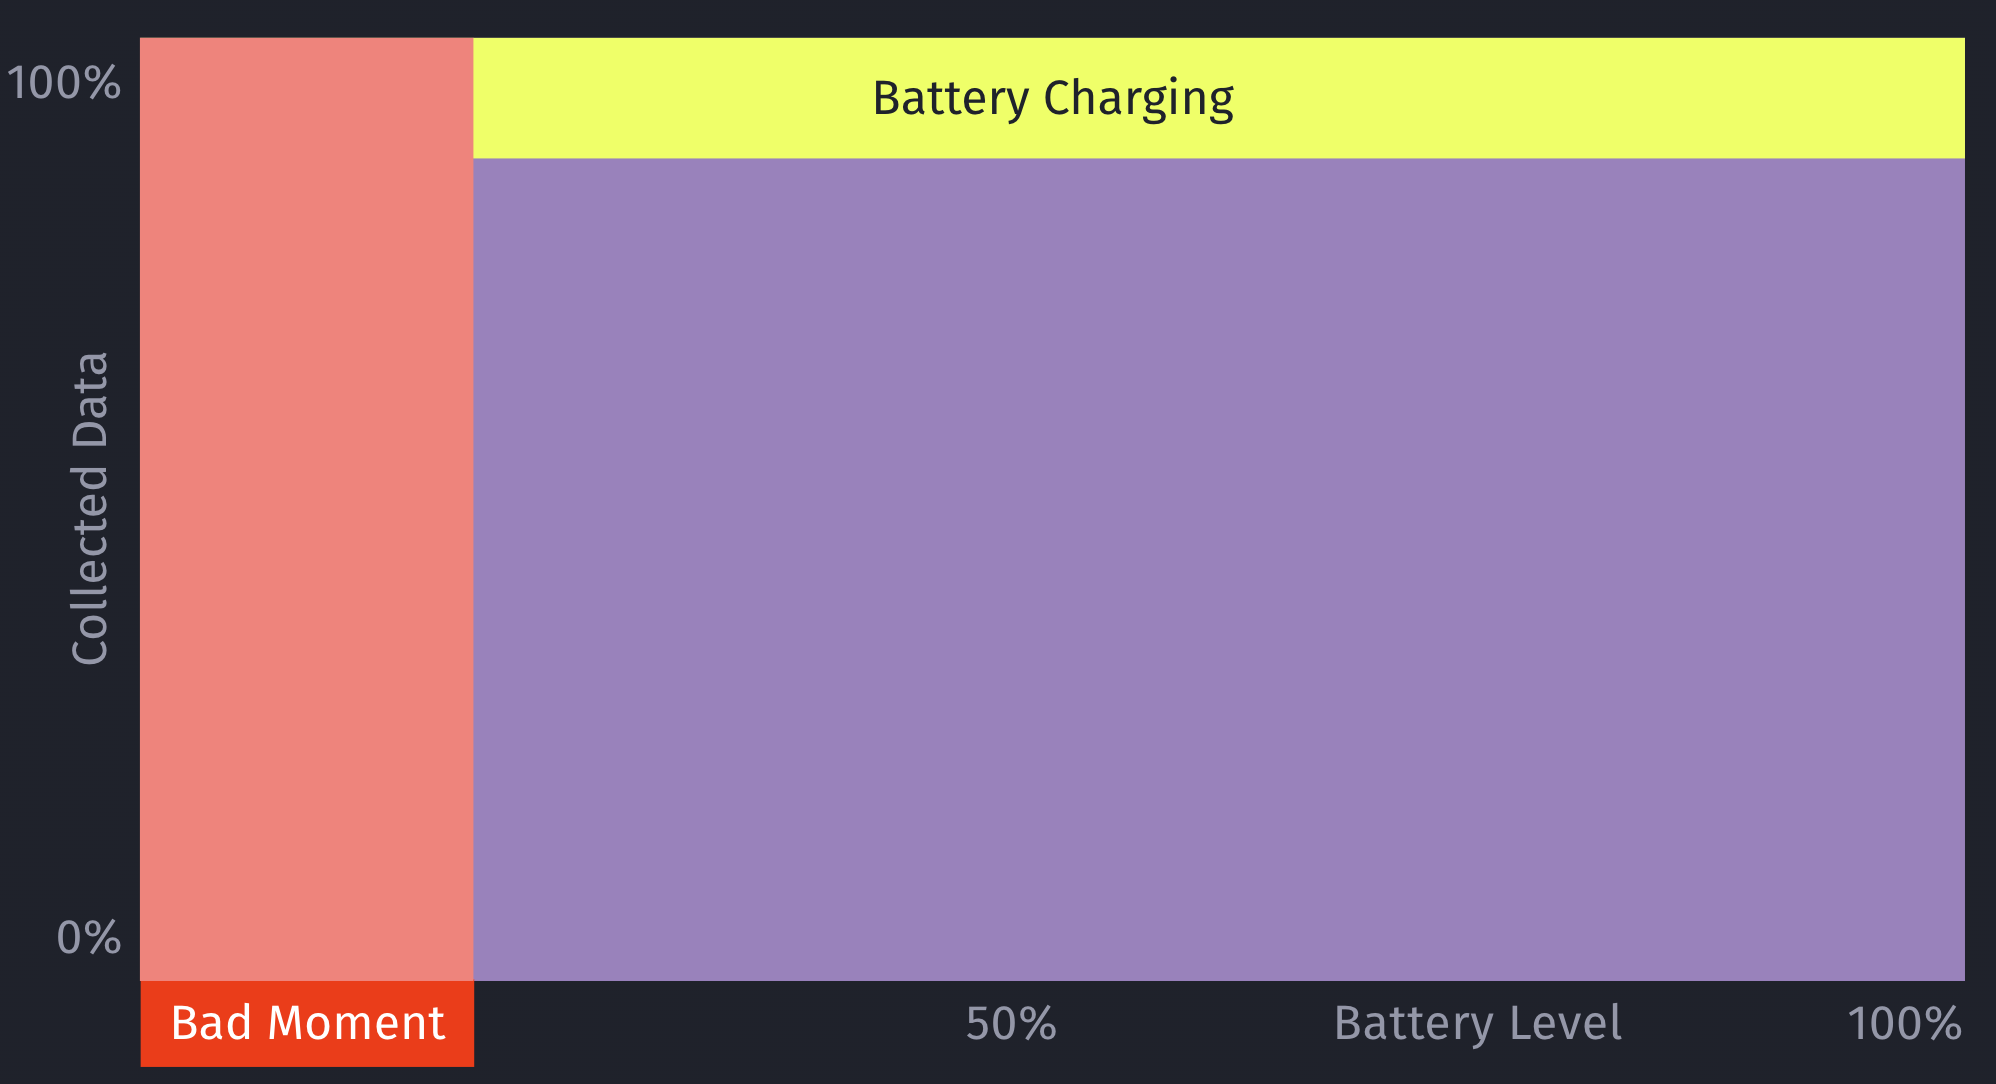
However, what if there are certain exceptions for those cases, that you’ll only learn about once you’ve collected more data? For example, maybe that <7% battery level rule doesn’t apply, if the phone is currently plugged in?
This is an important issue to consider when working with machine learning: Once you start making decisions based on your model, you’ll create blind-spots in your learning data.
How to solve data blindness?
The only way to get additional, real-world data for those blind spots is to still sometimes decide to show a certain prompt even if the ML model deems it to be a bad moment to do so. This should be optimized to a small enough percentage that it doesn’t meaningfully reduce your conversion rates, but at the same time enough that you’ll get meaningful, real-world data to train and improve your machine learning model over time. Once we train the initial ML model, we look into the absolute numbers of prompts & sales, and determine an individual value for what the percentage should be.
Additionally, by introducing this concept of still randomly showing a prompt even if the model deems it to be a bad moment, it can help to prevent situations where a user may never see a prompt, due to the rules of the model. For example, a model may learn that there are hardly any sales in a certain region, and therefore decide to always skip showing prompts.
This is something we prevent on multiple levels for ContextSDK, and this one is the very last resort (on-device) to be sure this won’t happen. We continuously analyze, and evaluate our final model weights, as well as the incoming upsell data, to ensure our models leverage enough different types of signals.
let hasInvalidResult = upsellProbability == -1
let coreMLUpsellResult = (upsellProbability >= executionInformation.upsellThreshold || hasInvalidResult)

// In order to prevent cases where users never see an upsell this allows us to still show an upsell even if the model thinks it's a bad time.
let randomUpsellResult = Double.random(in: 0...1) < executionInformation.randomUpsellChance

let upsellResult = (coreMLUpsellResult || randomUpsellResult) ? UpsellResult.shouldUpsell : .shouldSkip

// We track if this prompt was shown as part of our random upsells, this way we can track performance.
modelBasedSignals.append(SignalBool(id: .wasRandomUpsell, value: randomUpsellResult && !coreMLUpsellResult))
As an additional layer, we also have a control group (with varying sizes) that we generate and use locally.
How to compare your model’s performance with the baseline
We’re working with a customer who’s currently aggressively pushing prompts onto users. They learned that those prompts lead to churn in their user-base, so their number one goal was to reduce the number of prompts, while keeping as much of the sales as possible.
We decided for a 50/50 split for their user-base to have two large enough buckets to evaluate the model’s performance
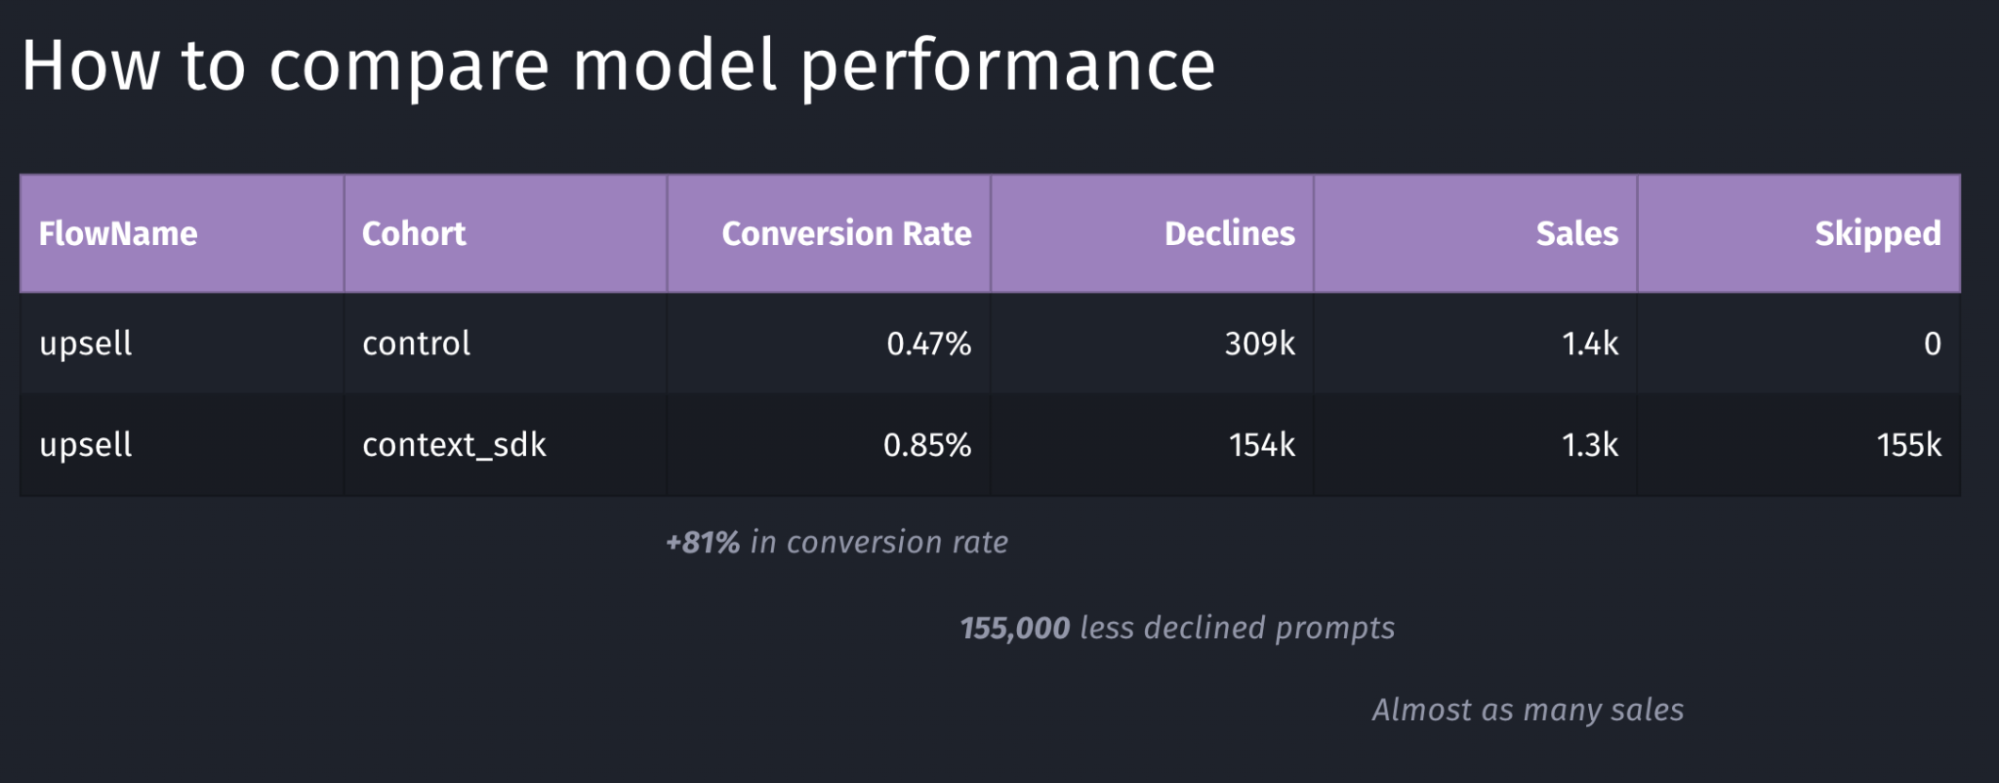
Depending on the goal of your model, you may want to target other key metrics to evaluate the performance of your model. In the table above, the main metric we looked for was the conversion rate, which in this case has a performance of +81%.
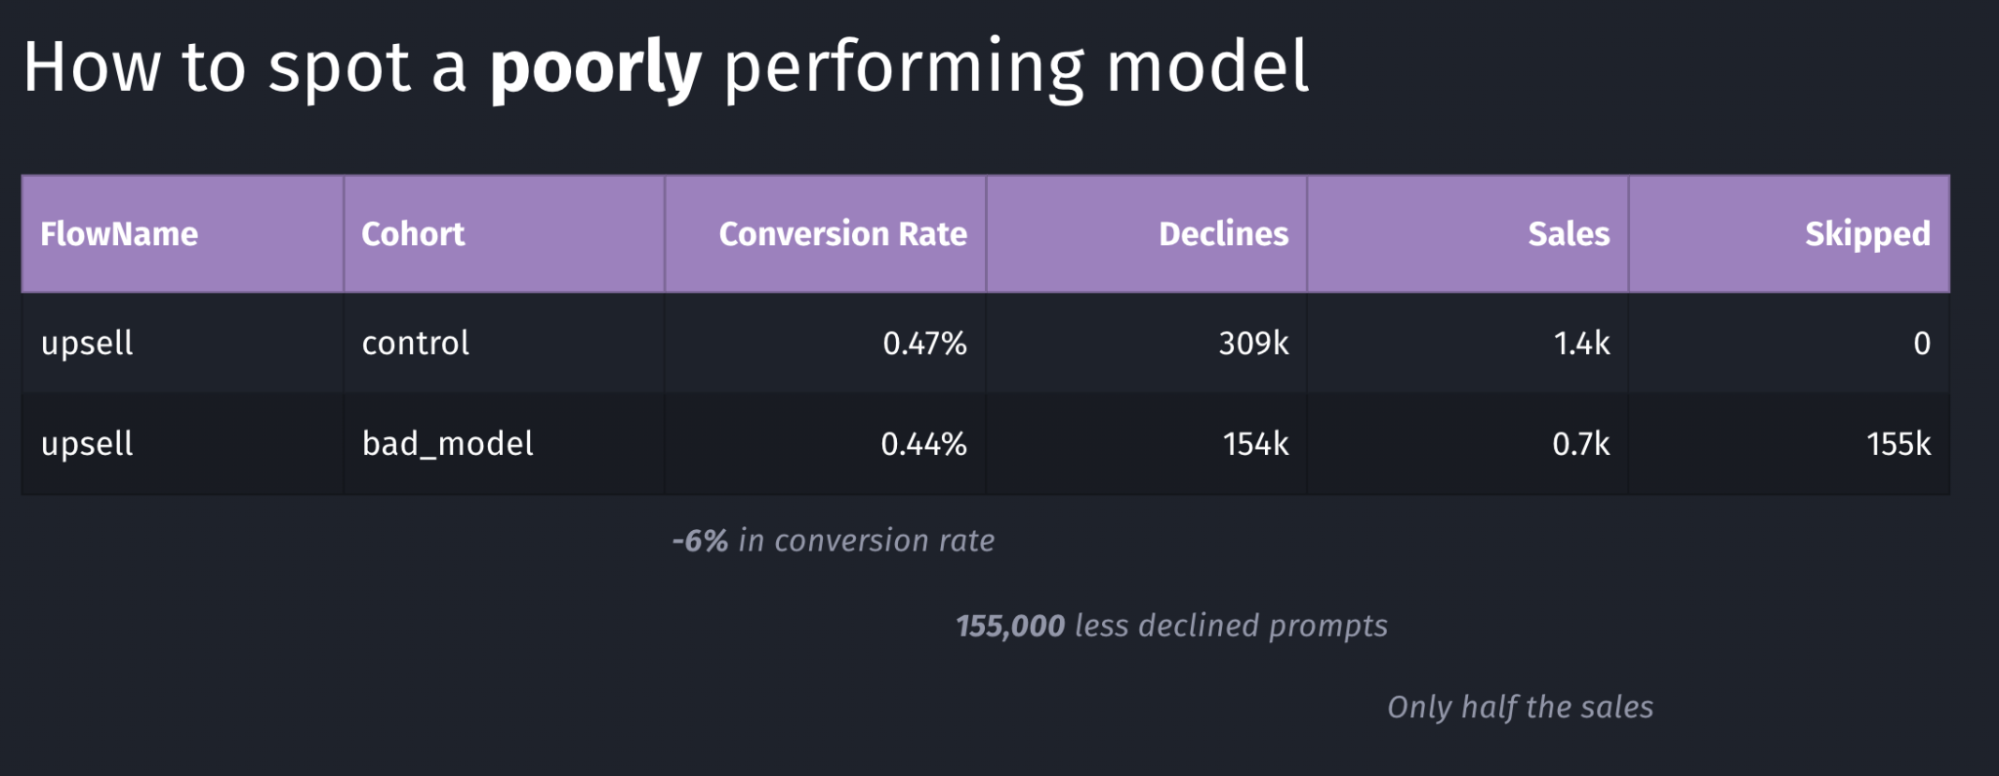
Above is an example of a model with poor performance: the conversion rate went down by 6% and the total number of sales dropped in half. Again, in our case we were looking for an increase in conversion rate, where in this case this goal is clearly not achieved.
Our systems continuously monitor whatever key metric we want to push (usually sales or conversion rate, depending on the client’s preference). As soon as a meaningful number of sales were made for both buckets, the performance is compared, and if it doesn’t meet our desired outcomes, the rollout will immediately be stopped, and rolled back, thanks to the over-the-air update system described in this article
Conclusion
In this article we’ve learned about the complexity of deploying machine learning models, and measuring and comparing their performance. It’s imperative to continuously monitor how well a model is working, and have automatic safeguards and corrections in place.
Overall, Apple has built excellent machine learning tools around CoreML, which have been built into iOS for many years, making it easy to build intelligent, offline-first mobile apps that nicely blend into the user’s real-world environment.
Tags: ios, context, sdk, swift, coreml, machine learning, sklearn, mlmodel, ota, over-the-air, remote, update, monitor, blind-spots | Edit on GitHub